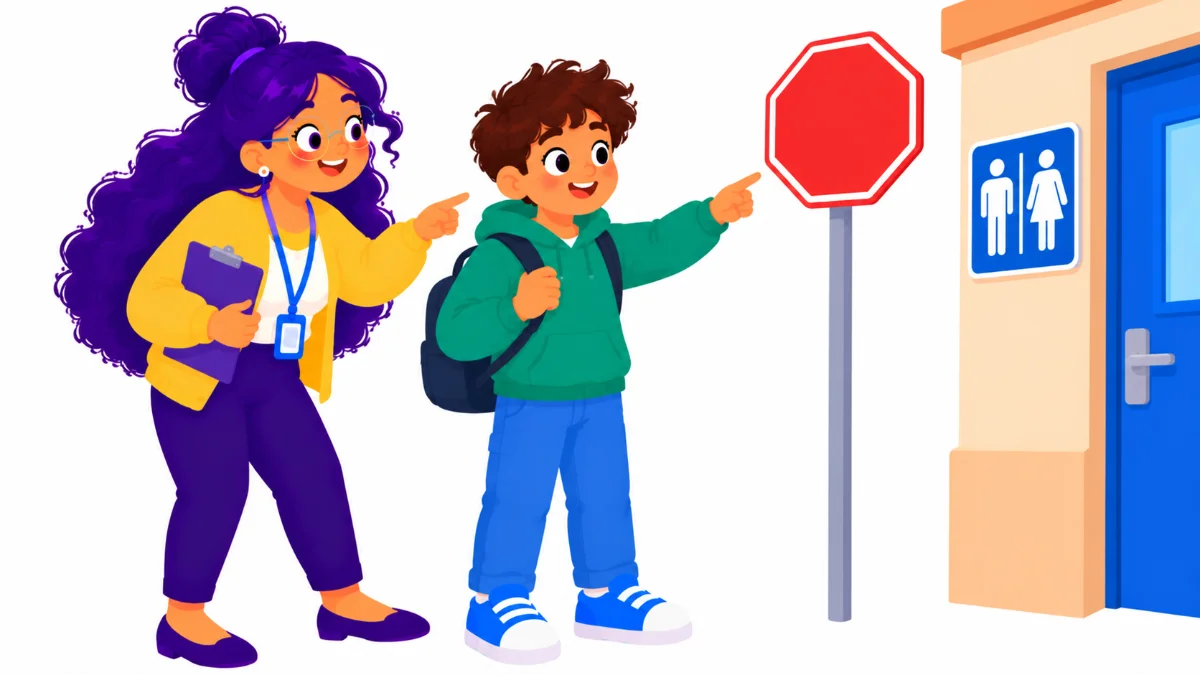

Community signs are everywhere a student goes: on the street, in the grocery store, at the clinic, and in the school hallway. Picture a thirteen-year-old on a class trip who stops at a red octagon but cannot say why, or who walks past the restroom symbol because the word on the door is not there. The sign was visible. However, the meaning was not.
This guide gives you five steps to teach community signs as real life skills: choose the signs that matter, teach clear meanings, practice matching, use the signs in real places, and track progress. By the end, you will have a simple plan that moves students from naming a sign to acting safely when they see it.
Examples are fictional. Adapt to the student’s goals and agreed supports. This is guidance, not a diagnosis.
At a glance
- Start with the signs a student meets most often and the ones that keep them safe.
- Teach each sign with a short, plain-language meaning and a matching action.
- Practice matching signs to meanings before moving into the community.
- Generalize skills with real photos, short walks, and trips.
- Track which signs the student reads without help, and review often.
1. Choose the community signs that matter most
First, decide which community signs to teach. A student does not need every sign at once. Instead, start with the signs that appear on the student’s daily routes and the ones linked to safety. A short, useful list beats a long list that never gets practiced.
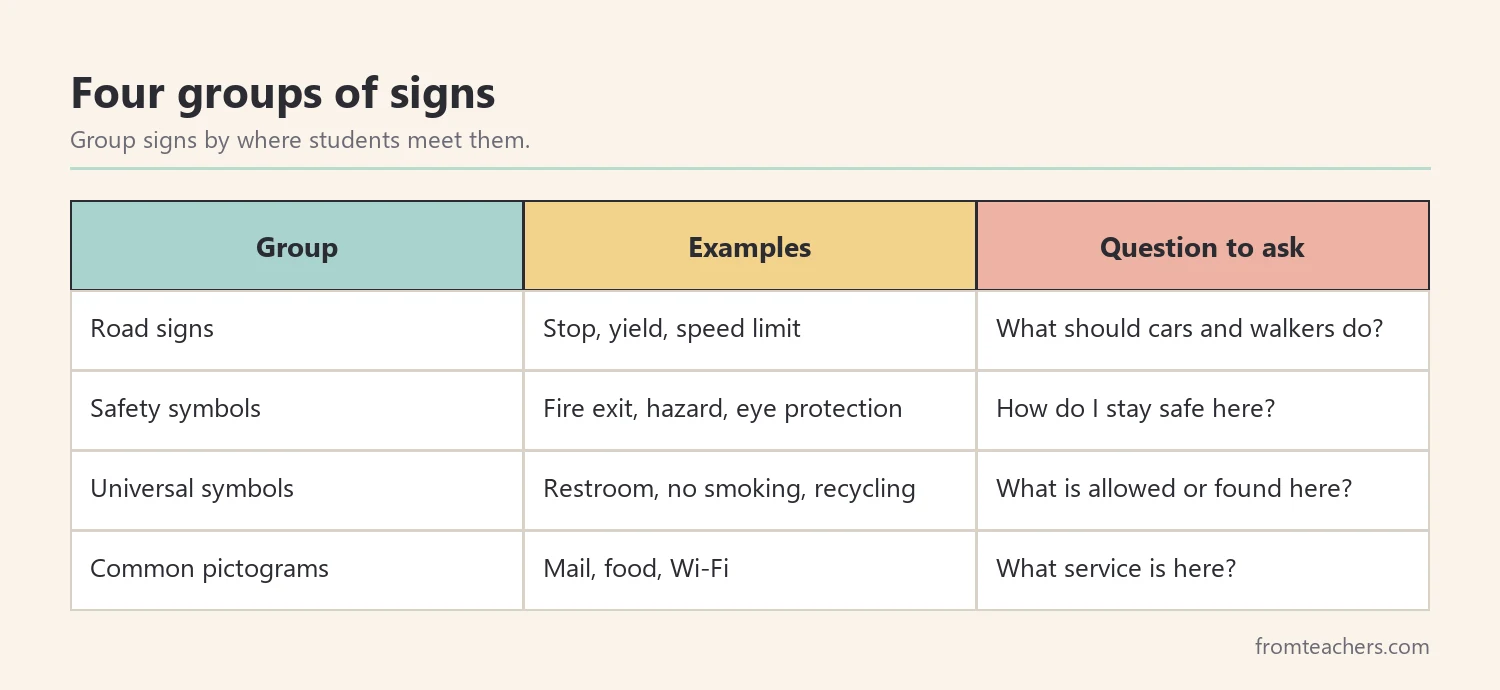
Next, sort signs into groups. Grouping helps students see that signs have a purpose. Road signs tell drivers and walkers what to do. Safety symbols warn people about danger or show how to stay safe. Universal symbols show what is allowed or available, such as a restroom or a recycling bin. Common pictograms point to services, such as mail, food, or Wi-Fi.
Also, look at the student’s real world. Where does the student walk, shop, eat, or wait? Which buildings do they enter each week? Talk with the family about places they visit together. That conversation often reveals the community signs that will make the biggest difference.
Moreover, keep the student in the planning. Show a few photos of community signs and ask which ones they have seen before. Students often notice signs adults overlook, such as a Wi-Fi symbol at a favorite cafe. Their answers tell you where to start and build motivation from day one.
Then, prioritize. Safety signs come first, such as stop, fire exit, and hazard warnings. After that, add the signs that support independence, such as restroom, food services, and no smoking. Finally, add signs connected to the student’s interests, because interest builds attention.
Worked example. Leo is a fictional seventh grader in a life skills class. His teacher, Ms. Rivera, talks with his family and learns that he walks to a corner store with his older sister and visits a community center on weekends. She picks twelve target signs across four groups, starting with stop, yield, fire exit, and restroom.
2. Teach a clear meaning for each sign
Now, teach what each sign means in simple words. A plain-language meaning is short, concrete, and tied to an action. For example, “Stop sign: stop all the way and look before you go” is easier to use than a long definition.
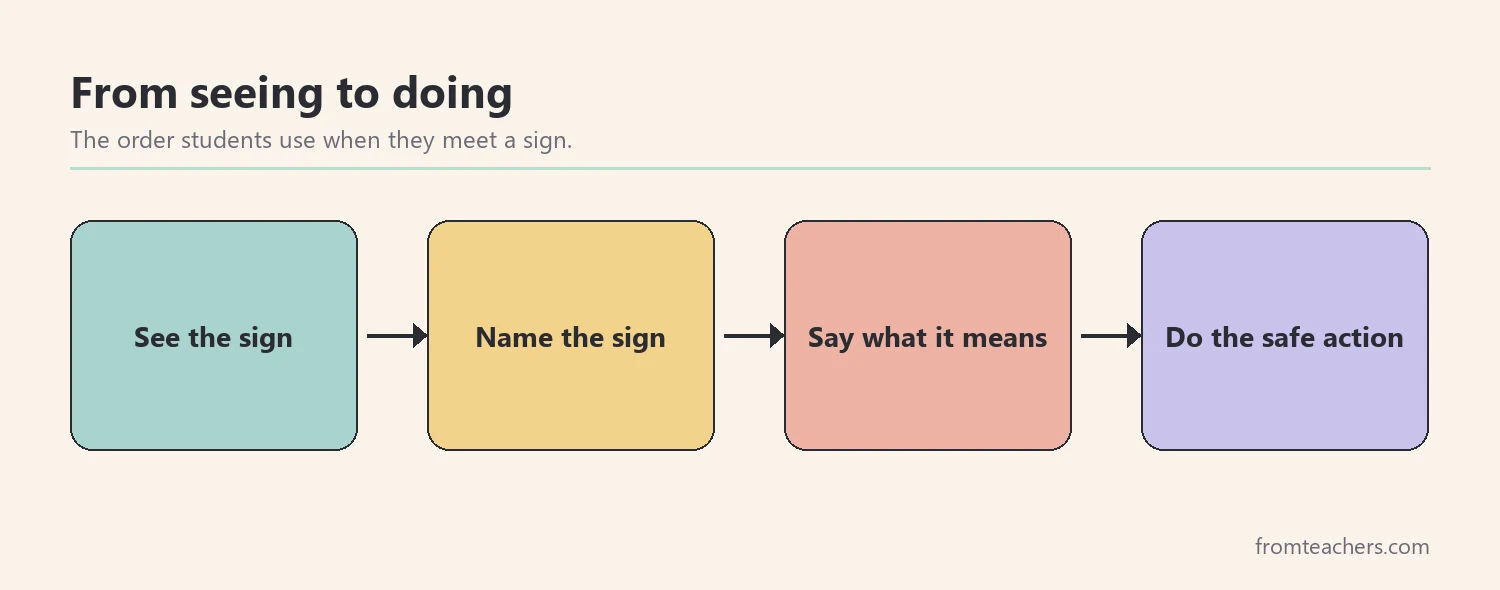
In addition, show the sign and the meaning together. Students who are still building reading skills rely heavily on visual cues: shape, color, and picture. A stop sign is red with eight sides. A fire exit sign often shows a running figure and an arrow. Point out these features every time you teach community signs, so the student learns what to look for.
Also, connect each sign to a question. Ask, “What should we do?” for road signs, “How do we stay safe?” for safety symbols, and “What is here?” for universal symbols and pictograms. These questions give students a routine for thinking about any new sign later.
For a ready-made visual, the Matching Signs to Meanings poster pairs common signs and symbols with plain-language explanations. It groups road signs, safety symbols, universal symbols, and common pictograms, which fits this step well and gives students a reference they can return to.
Then, keep the language consistent. If one adult says “Exit” and another says “Way out,” some students will think these are different ideas. Agree on a short meaning for each sign and use it across the team. Write the agreed phrase on an index card for every adult who works with the student.
| Sign | Plain meaning | Action |
|---|---|---|
| Stop | Stop all the way | Stop, look, then go |
| Yield | Let others go first | Slow down and wait |
| Fire exit | Way out in an emergency | Follow it when told |
| Restroom | Toilets are here | Go in when needed |
3. Practice matching community signs to meanings
Next, give students many short chances to match community signs with their meanings. Matching is a strong bridge between seeing a sign and understanding it. It lets the student show knowledge without long verbal answers, which helps students with language or speech needs.
Start simply. Show two signs and one meaning, and ask the student to point to the match. As accuracy grows, add a third choice, then a fourth. After that, reverse the task: show one sign and several meanings. This builds flexible understanding instead of rote memory.
Also, mix the formats. Use cards on a table, a file folder activity, a pocket chart, or a digital slide. Some students prefer to draw a line from sign to meaning, just as a poster with arrows shows. Others like sorting cards into groups. Variety keeps practice fresh while the goal stays the same.
For example, a quick game can help. Lay out six community signs face up, describe one meaning, and let the student find the matching sign. Then switch roles so the student describes and you find. Role switching builds the language for explaining signs to others.
Moreover, keep sessions short. Five to ten minutes of focused practice, a few times a week, often works better than one long session. End each session with a success, even if that means going back to an easier set.
Finally, add the action. After the student matches a sign, ask them to show or say what they would do. For example, they might pretend to stop at a line on the floor or walk toward a pretend exit. This step turns community signs into behavior, not only vocabulary.
Worked example. Leo practices with Ms. Rivera three times a week. In week one, he matches stop and restroom easily but confuses yield with stop. So, she pulls those two signs out and practices them side by side, pointing to shape and color. Within a week, Leo can explain, “Yield means let others go first.”
4. Use community signs in real places
Now, move learning into the real world. Classroom matching is useful, but the real test is the sidewalk, the store, or the bus stop. Generalization means the student can read the sign in a new setting, at a new size, and from a new angle.
First, use real photos. Take pictures of signs in the school, on nearby streets, and in places the student visits. Real photos show signs in their messy context: faded paint, odd angles, and busy backgrounds. Practice with these photos before any trip.
Next, walk the school. Most schools already have many community signs: exit signs, restroom symbols, no smoking signs, recycling bins, and hazard labels in some rooms. A short walk around the building is a safe first step toward the community.
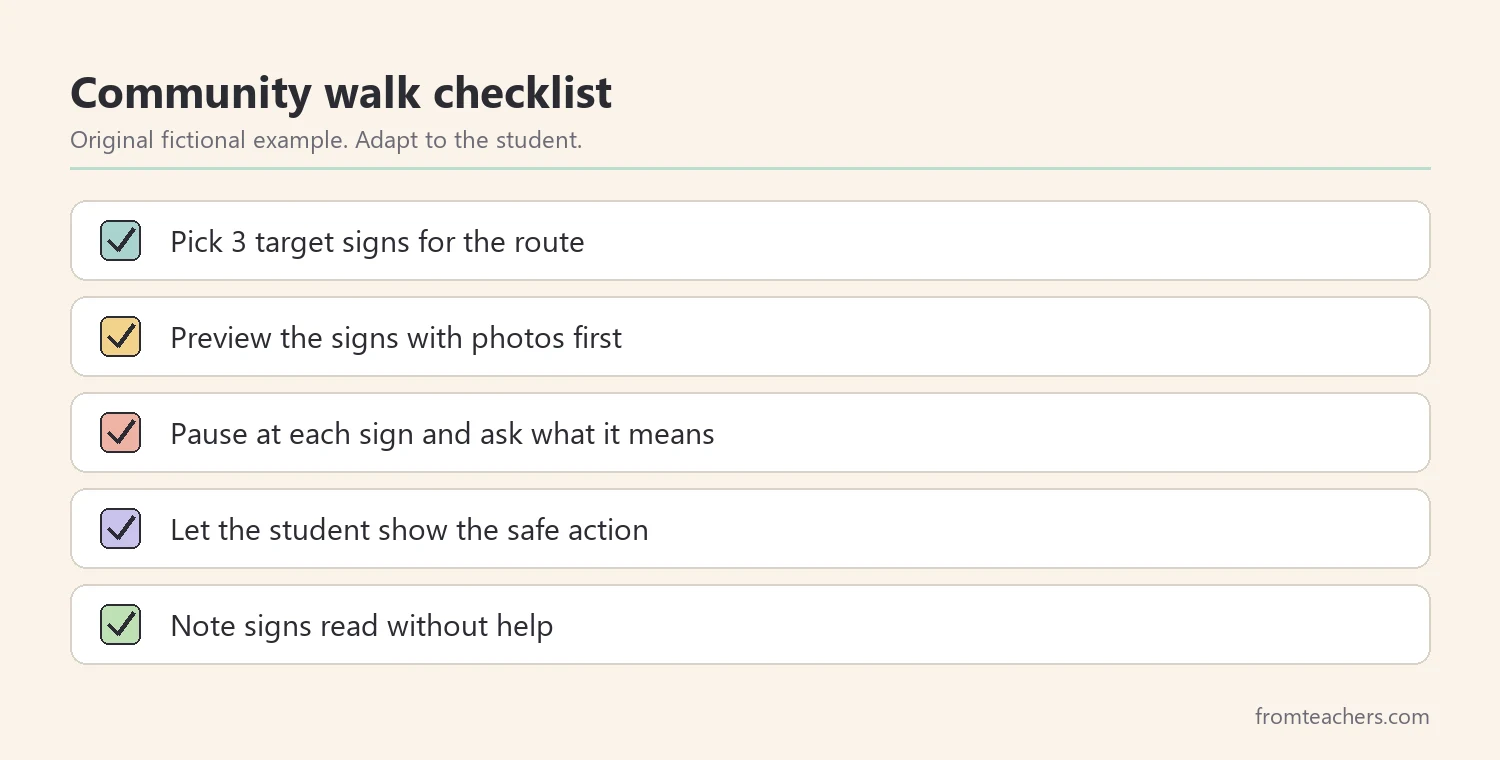
Then, plan a short community walk. Pick a route with three target signs. Preview the signs with photos first. On the walk, pause at each sign and ask the student what it means and what to do. Let the student show the safe action. Afterwards, note which signs the student read without help.
In addition, vary the setting slowly. Once the student reads community signs on one route, try a second route or a different store. The same sign may look larger, smaller, or newer in another place. Each new setting is a small test of real understanding, so celebrate it when the student succeeds.
Also, follow your school’s procedures for community-based instruction. Check supervision ratios, permission forms, and safety plans. Work with your administrator and the family before leaving campus.
Worked example. Ms. Rivera plans a walk to the corner store near school with Leo and two classmates. The target signs are stop, yield, and no smoking. Leo stops at the corner and says, “Stop all the way.” He needs a prompt for yield, so Ms. Rivera writes that down for the next lesson.
5. Track progress and review community signs often
Finally, keep a light record. You do not need a complex data sheet. A simple table with the week, the number of signs practiced, and the number read without help is enough to show growth and guide your next lessons.
In addition, record where the student read the sign. Reading a sign on a poster is a different skill from reading it on a busy street. A small note, such as “classroom,” “school walk,” or “community,” helps the team see whether skills are generalizing.
Also, review old community signs regularly. Skills fade without practice, especially for signs the student rarely meets. Mix one or two mastered signs into every session. This keeps them fresh and gives the student quick wins.
Next, use the record to plan. If a student reads most community signs in class but not on walks, spend more time on real photos. If they struggle with one group, such as safety symbols, focus the next two weeks there. Data are useful only when they change what you teach next.
Then, share progress with the family. Families can practice community signs on everyday outings, such as a trip to the grocery store. Send home a short list of the current target signs and the agreed plain meanings so everyone uses the same words.
Moreover, connect the record to the student’s goals. If the student has an IEP goal related to functional reading or community safety, your simple table can support progress monitoring. Follow your school’s procedures and the team’s decisions on how data are collected and reported.
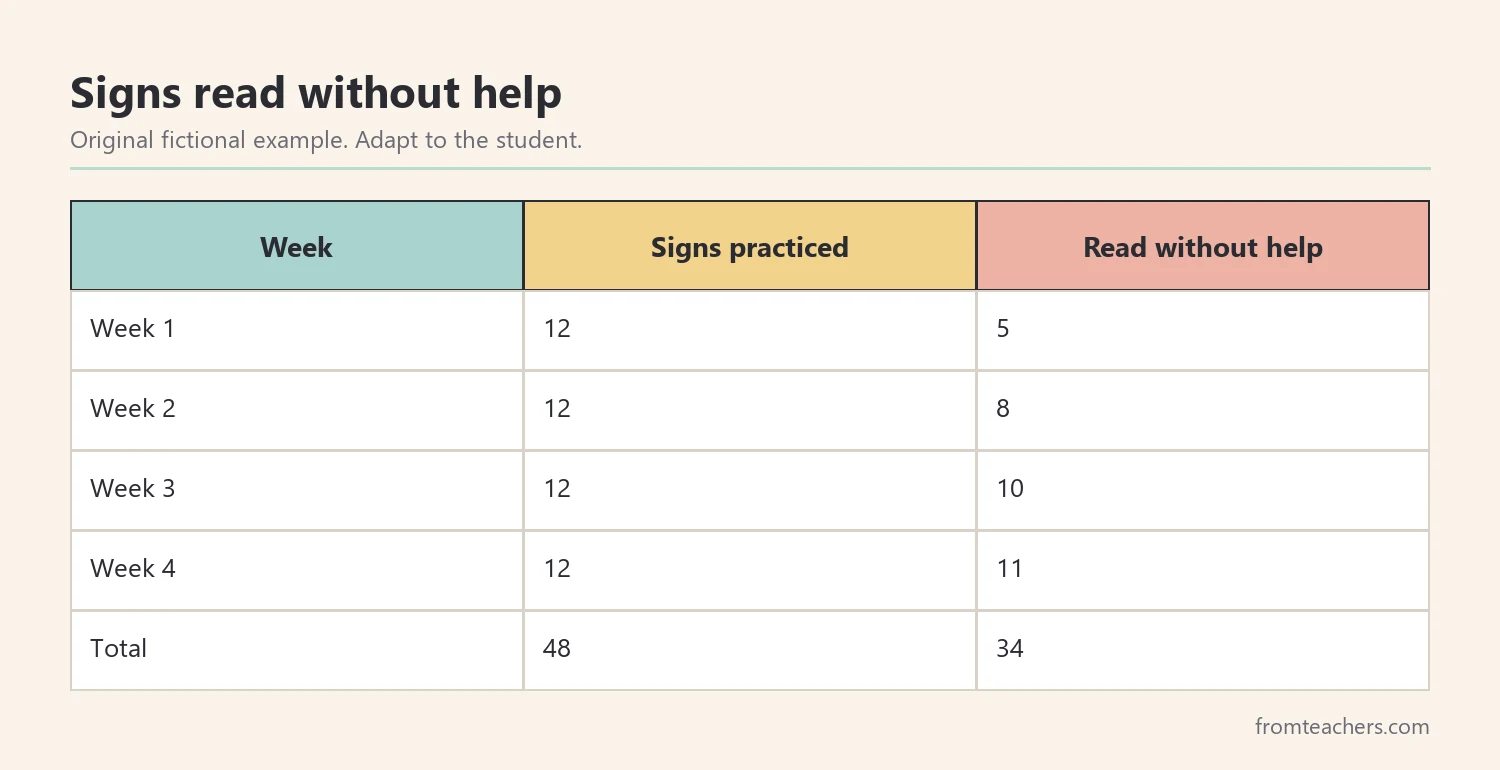
Worked example. Over four weeks, Leo practices the same 12 signs. He reads 5 without help in week one, 8 in week two, 10 in week three, and 11 in week four. The one sign he still needs help with is yield, so it stays on the list for the next month, along with three new signs.
Common mistakes and how to avoid them
- Teaching too many signs at once. Students get confused and lose confidence. Fix: start with a short list of safety and daily-use signs.
- Only teaching names. A student can say “stop sign” and still walk into the street. Fix: always pair the sign with an action.
- Using different words across adults. Mixed language slows learning. Fix: agree on one plain meaning per sign.
- Staying in the classroom. Skills may not transfer to real places. Fix: use real photos, school walks, and planned community trips.
- Never reviewing. Mastered signs fade over time. Fix: mix old signs into every session.
Questions teachers and parents ask about community signs
Which community signs should we teach first?
Start with safety signs such as stop, fire exit, and hazard warnings. Then add signs the student meets often, such as restroom and food services. The family can help you identify signs on the student’s real routes.
Can students who do not read words learn signs?
Yes. Many signs rely on shape, color, and pictures rather than words. Students can learn to recognize these visual features and connect them to a meaning and an action.
How long should practice sessions be?
Short sessions often work well, around five to ten minutes a few times a week. Watch the student’s attention and end on a success. Adjust the length to the student’s needs.
How do we practice at home?
Point out signs during everyday outings and ask, “What does it mean? What do we do?” Use the same plain meanings the school uses. Take photos of new signs to share with the teacher.
When is a student ready for community trips?
A student is usually ready when they can match target signs in class and in real photos. Follow your school’s procedures for community-based instruction, and plan the trip with the team and family.
Related reading: Navigating the Path to Adulthood: Building Essential Life Skills, Building Workplace Readiness: Essential Skills for Career Success, and Special Education Strategies: 10 Powerful Ways Teachers Can Succeed.
A companion resource for community signs:
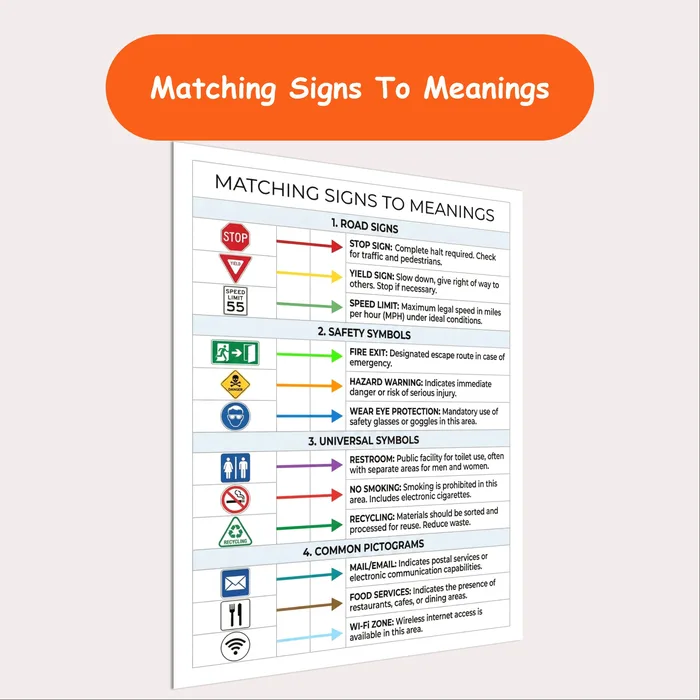
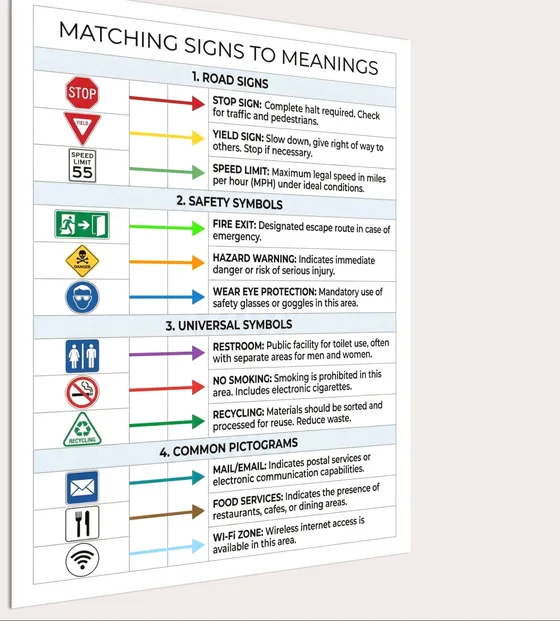
Matching Signs to Meanings Poster: a life skills poster that pairs common road signs, safety symbols, universal symbols, and pictograms with plain-language explanations for functional academics and community safety lessons.
Sources and scope
- IRIS Center, Vanderbilt University: free modules on evidence-based practices and instruction for students with disabilities.
- IDEA, U.S. Department of Education: the law behind special education, including transition services and functional goals.
- National Highway Traffic Safety Administration (NHTSA): general information on road and pedestrian safety.
- Understood.org: family-friendly information on learning and thinking differences.
This guide covers everyday classroom and home teaching of common signs and symbols. It does not replace your school’s community-based instruction procedures, safety plans, or the decisions of the student’s support team.
Key takeaways
- Choose a short list of safety and daily-use signs first.
- Teach one plain meaning and one action for each sign.
- Practice matching in short, varied sessions.
- Generalize with real photos, school walks, and planned trips.
- Track signs read without help and review them often.



Leave a Comment