

Break time choices give students a calm, planned way to step back before frustration turns into a meltdown. Picture a second grader who starts tapping his pencil, then pushes his worksheet away, then slides under the desk. Each of those moments was a chance to offer a better option, if only he had a clear menu to choose from.
This guide walks you through five steps: noticing early signs, building a menu of break types, teaching the routine, setting limits that protect learning time, and tracking what works. By the end, you will be able to set up break time choices that students actually use and return from.
Examples are fictional. Adapt to the student’s goals and agreed supports. This is guidance, not a diagnosis.
At a glance
- A planned break is a learning tool, not a reward or a punishment.
- Six break types cover quiet, movement, sensory, breathing, calm thinking, and social needs.
- Teach the break routine when the student is calm, before it is needed.
- Short, timed breaks with a clear return step keep learning on track.
- Simple tracking shows which break time choices actually help.
1. Notice the early signs a break is needed
First, learn what “I need a break” looks like for each student. Few children say those words out loud. Instead, they show it with their bodies: fidgeting, putting their head down, humming, chewing a sleeve, or getting louder.
Next, watch for patterns over a few days. Note the time, the activity, and what you saw just before the student became upset. You will often find that signs appear at the same points, such as long writing tasks, noisy transitions, or the end of the morning.
Also, separate early signs from late signs. Early signs are small and easy to miss. Late signs, such as shouting or running, mean the student is already overwhelmed. Break time choices work best when they are offered at the early stage, while the student can still think and choose.
In addition, talk with the student about their signals. Older students can often name what happens in their body: “My hands get hot” or “My head feels busy.” Younger students may point to pictures. Either way, the student becomes a partner in noticing.
Finally, share what you learn with the team. The special education teacher, occupational therapist, and family may already know useful signs. A short shared list helps every adult respond the same way.
Worked example. Leo is a fictional second grader. His teacher, Ms. Rivera, notices that he taps his pencil and hums about five minutes into independent writing. Over one week, she sees this pattern on four of five days. She decides that tapping plus humming will be Leo’s cue to choose a break.
2. Build a menu of break time choices
Next, give students real options. A single “go to the calm corner” break does not suit every need. Some students need to move. Others need quiet, deep pressure, or a calm person to talk to. A short menu of break time choices lets each student find what helps their body and brain.
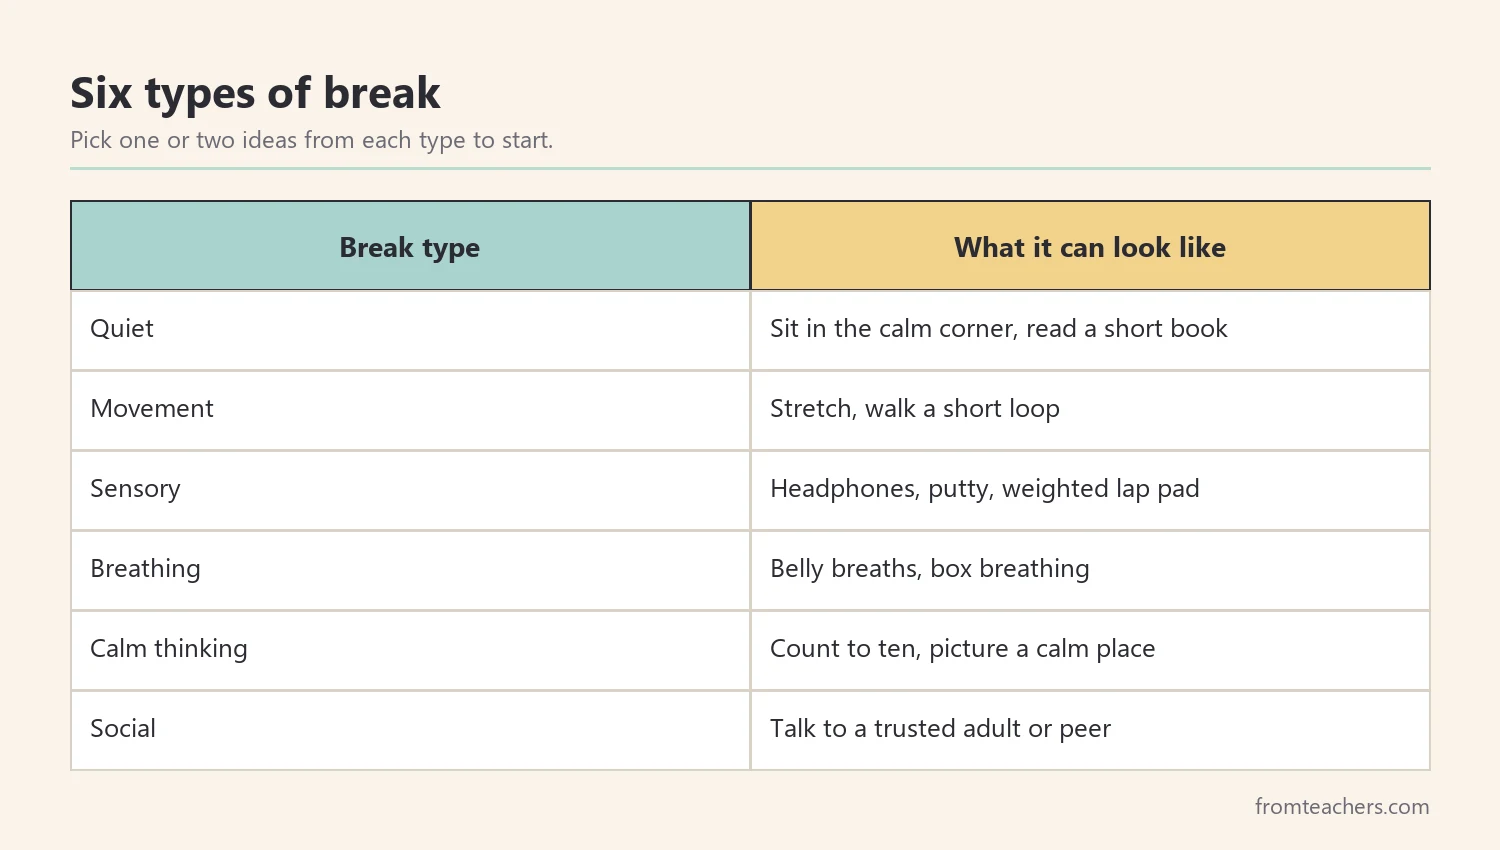
For example, many teachers group breaks into six types. Quiet breaks include sitting in a calm corner or looking at a book. Movement breaks include stretches or a short walk. Sensory breaks include noise-canceling headphones or putty. Breathing breaks include belly breaths. Calm thinking breaks include counting or picturing a calm place. Social breaks include talking with a trusted adult.
Also, keep each option short and simple. A break idea should be something a student can start alone in under a minute. If an option needs a lot of setup or adult help, save it for a planned sensory routine instead.
Check every option with the team
In addition, check every option with the team. Some sensory items, such as weighted lap pads, should follow the advice of an occupational therapist. Some movement breaks may not suit every space. A quick check prevents surprises later.
Then, make the menu visual. Pictures help students who read below grade level, students learning English, and anyone who is upset and cannot process many words. The break time choices poster with six illustrated break categories is one ready-made option for a calm corner or wall near the door.
Worked example. Ms. Rivera asks Leo to try one option from each type over two weeks. Leo likes the short hallway walk and putty best. He does not enjoy the calm corner. Ms. Rivera marks those two favorites on his personal break card.
3. Teach the break routine before it is needed
Next, teach the routine when everyone is calm. A student who is already overwhelmed cannot learn a new procedure. So, practice break time choices during a quiet moment, the same way you would practice a fire drill.
First, model each step yourself. Show the signal, such as placing a break card on the desk or pointing to the poster. Then show how to choose, where to go, how to use the timer, and how to come back. Think aloud: “My body feels busy. I will pick a movement break.”
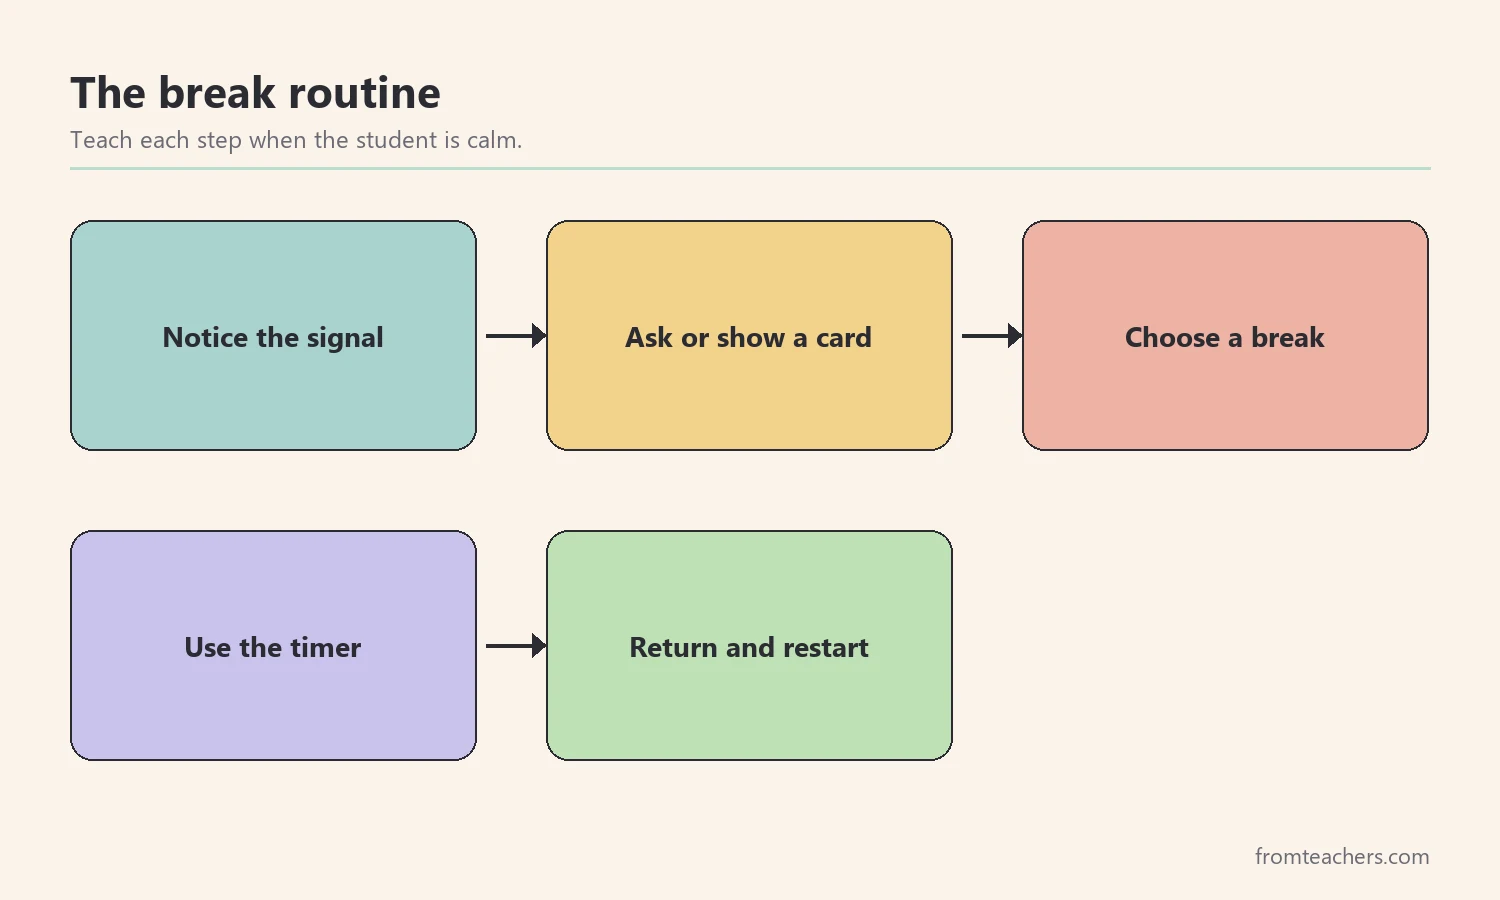
Also, let students practice the routine several times. Role play a pretend moment. Praise each step, especially the return. Returning is the hardest part for many students, so it deserves the most practice.
Agree on a quiet signal
In addition, agree on a nonverbal signal. Some students do not want classmates to hear them ask. A break card, a hand signal, or a small picture on the desk works well. The signal should be quick and private.
Meanwhile, keep the language consistent. Use the same words every time: “Break or work?” or “Which break helps your body?” Predictable language lowers the effort of choosing.
Then, set up the space before you launch. Put the menu at the student’s eye level, have a timer ready, and make sure the break area is easy to reach without crossing the whole room.
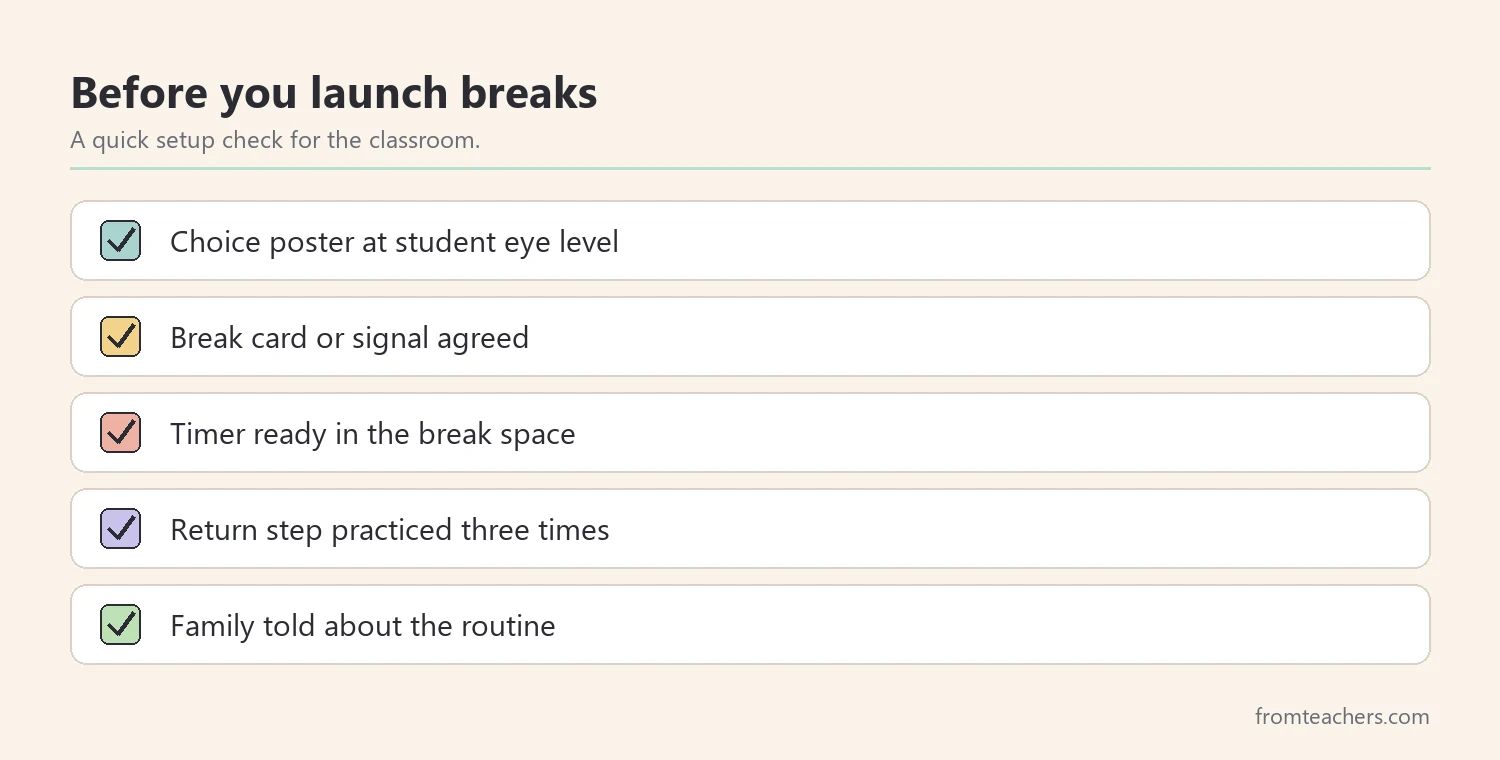
Worked example. Ms. Rivera practices the routine with Leo three times during morning work. He places his green card on the desk, points to the hallway walk picture, sets a three-minute sand timer, walks to the end of the hall and back, and then sits down. Each time, she says, “You came back. Nice work.”
4. Set clear limits for break time choices
Next, protect learning time with simple limits. Breaks are most helpful when they are short and predictable. Without limits, a break can slowly become a way to avoid hard tasks.
First, set a time. Many classrooms use two to five minutes, depending on age and need. A visual timer or sand timer helps the student see time passing without an adult reminding them.
Also, decide how many breaks are available. Some students start with a set number of break cards for the morning. Others can ask whenever they notice their signs. Start generous, then adjust as you learn more.
In addition, make the return step clear. When the timer ends, the student goes back to the same task, perhaps with a smaller first step. “Write one sentence, then check in” is easier to restart than “finish the page.”
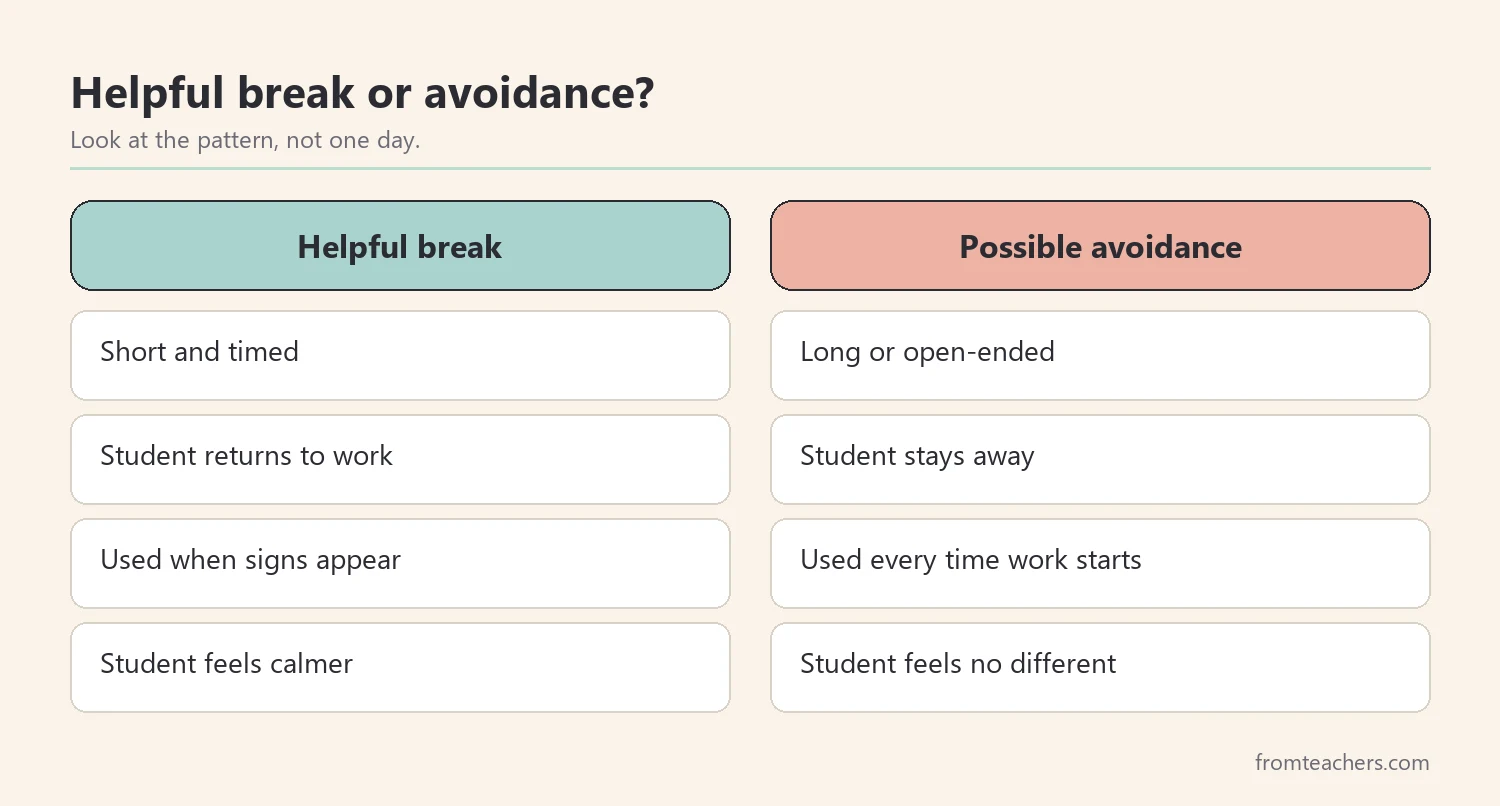
Meanwhile, watch for avoidance without blaming the student. If a student asks for a break every time a certain task begins, that is useful information. The task may be too hard, too long, or unclear. Adjust the work, not just the break.
Finally, keep breaks neutral. A break is not a reward for good behavior or a punishment for bad behavior. It is a regulation tool. Students should never lose access to break time choices as a consequence.
Worked example. Leo starts with three break cards each morning. Each break lasts three minutes. When he returns, Ms. Rivera gives him a sticky note with one small task. After one week, Leo uses two or three cards most mornings and rarely runs out.
5. Track and review what works
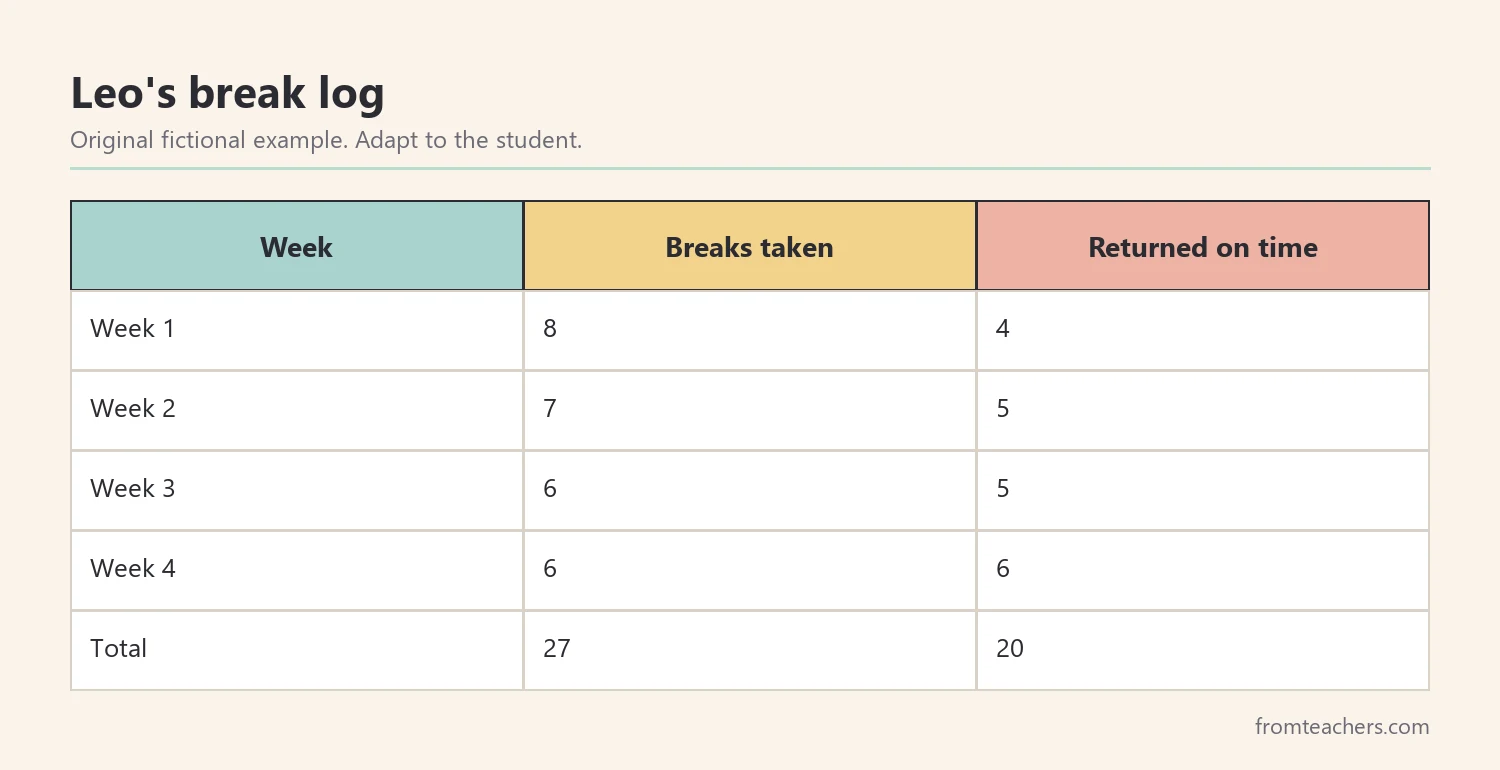
Finally, collect light data. You do not need a complex system. A simple tally of breaks taken, the type chosen, and whether the student returned on time tells you a lot.
Next, look at the data weekly. Are some break time choices used often but followed by slow returns? Are some never chosen? Do breaks cluster around certain subjects? These patterns help you adjust the menu and the work.
Also, ask the student. Even young children can rate a break with a thumbs up or down. Older students can answer, “Did that break help you get back to work?” Their view often explains what the data cannot.
In addition, share progress with the family. A short note such as “Leo chose a break and came back on time six times this week” is clear and encouraging. Families may want to try a similar menu at home.
Then, plan to fade support over time. As students get better at noticing their signs, they may need fewer reminders and shorter breaks. Celebrate this independence, but keep the menu available. Everyone has hard days.
Worked example. Ms. Rivera tracks Leo for four weeks. He takes 8 breaks in week 1 and returns on time 4 times. In week 2, he takes 7 and returns on time 5 times. By week 3, he takes 6 and returns on time 5 times. In week 4, he takes 6 and returns on time all 6 times. Across the month, that is 20 on-time returns out of 27 breaks.
Using break time choices at home
Families can use the same idea. A short menu on the fridge, a calm spot in a bedroom, and a kitchen timer are enough to start. Using the same words at home and school helps children transfer the skill.
Also, keep home breaks just as neutral. A break during homework is a chance to reset, not a punishment. Short breaks with a clear return usually work better than long ones.
Common mistakes and how to avoid them
- Offering breaks only after a meltdown. The student is too upset to choose. Fix: offer break time choices at the first early signs.
- Using breaks as rewards or punishments. Students learn breaks are about behavior, not regulation. Fix: keep breaks neutral and always available.
- Too many options. Long menus overwhelm a stressed student. Fix: start with six types and two personal favorites.
- No return step. Breaks stretch on and learning stops. Fix: use a timer and a small first task on return.
- Teaching the routine in the moment. Upset students cannot learn new steps. Fix: practice when calm.
- Ignoring patterns. Frequent breaks may point to a task problem. Fix: review data weekly and adjust the work.
Questions teachers and parents ask about break time choices
How long should a classroom break last?
Many teachers use two to five minutes, adjusted for age and need. A visual timer helps students see when the break ends. The team can adjust the length based on how the student returns.
Will other students want breaks too?
Often, yes, and that can be a good thing. Many teachers make break time choices available to the whole class, with clear limits. When everyone can use the menu, no one stands out.
What if a student never wants to come back?
First, check whether the task is too hard or unclear. Then shorten the break, add a small return task, and praise every return. If the pattern continues, discuss it with the team.
Are breaks the same as a calm corner?
A calm corner is one place to take a break. Break time choices are broader and include movement, sensory, breathing, thinking, and social options. A calm corner can hold the menu.
Should breaks be written into an IEP?
Breaks are sometimes listed as an accommodation in an IEP or 504 plan. That decision belongs to the student’s team. Teachers can share data to help the team decide.
Related reading: Managing Sensory Overload: Practical Strategies for Autism and ADHD, Meltdowns vs Tantrums: A Guide to Understanding and Responding, and Accommodations vs Modifications in Special Education: The Difference Explained.
A companion resource for break time choices:
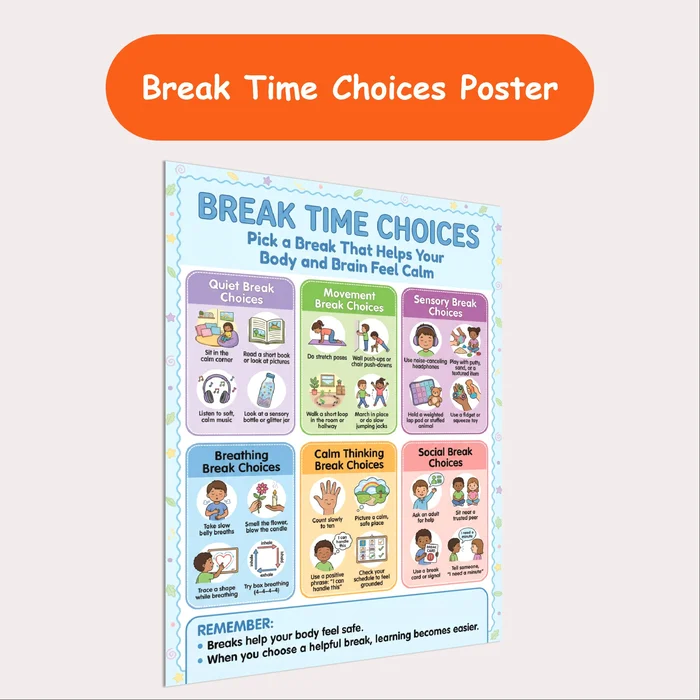
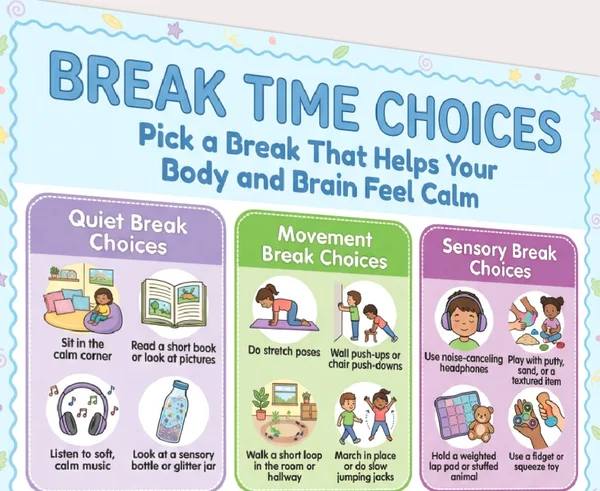
Break Time Choices Poster: a printable classroom poster with six illustrated break categories (quiet, movement, sensory, breathing, calm thinking, and social breaks) that helps students pick a break that helps their body and brain feel calm. Useful for special education, sensory support, and calm corners.
Sources and scope
- IRIS Center, Vanderbilt University: free modules on classroom behavior, self-regulation, and supports.
- Center on PBIS: guidance on positive, proactive classroom systems and routines.
- American Occupational Therapy Association (AOTA): information on occupational therapy and sensory supports in schools.
- Understood.org: family-friendly information on learning and thinking differences.
This guide covers everyday classroom and home routines for planned breaks. It does not replace occupational therapy advice, a behavior plan, or the decisions of the student’s support team.
Key takeaways
- Offer break time choices at the first early signs, not after a meltdown.
- Use a short visual menu across six break types.
- Teach and practice the routine when the student is calm.
- Keep breaks short, timed, and neutral, with a clear return step.
- Track breaks and returns weekly, then adjust the menu and the work.








Leave a Comment