

A coping skills menu is a short, visual list of calming options that lets a student choose what will help their body and brain feel better, instead of waiting for an adult to decide. Picture a fourth grader who just lost a spelling game. His face turns red, his fists clench, and he starts kicking the table leg. If an adult points to a menu and asks, “Which one do you want to try?”, he has a way forward that still feels like his own choice.
This guide gives you five steps to make a coping skills menu work: understand why choice matters, fill the menu with six groups of options, teach each option before it is needed, use the menu in the moment, and review and personalize it over time. By the end, you will have a practical system for a classroom, calm corner, counseling office, or home.
Examples are fictional. Adapt to the student’s goals and agreed supports. This is guidance, not a diagnosis.
At a glance
- A menu gives students choice, which can make calming tools feel less like a punishment.
- Six groups cover most needs: breathing, movement, sensory, social, communication, and calm corner.
- Teach each option when students are calm, so it is familiar later.
- In the moment, offer the menu with few words and a calm voice.
- Everyone needs coping skills, and choosing one is a healthy, brave choice.
1. Understand why a coping skills menu works
First, think about what a student experiences when upset. Their body is flooded, their thinking is foggy, and an adult’s long instructions are hard to process. A coping skills menu cuts through that. It offers a few clear pictures and words, and the student simply picks one.
Next, notice the power of choice. Many students resist when told exactly what to do, especially when already upset. A menu changes the message from “Do this” to “What would help you?” That small shift can lower resistance and build independence.
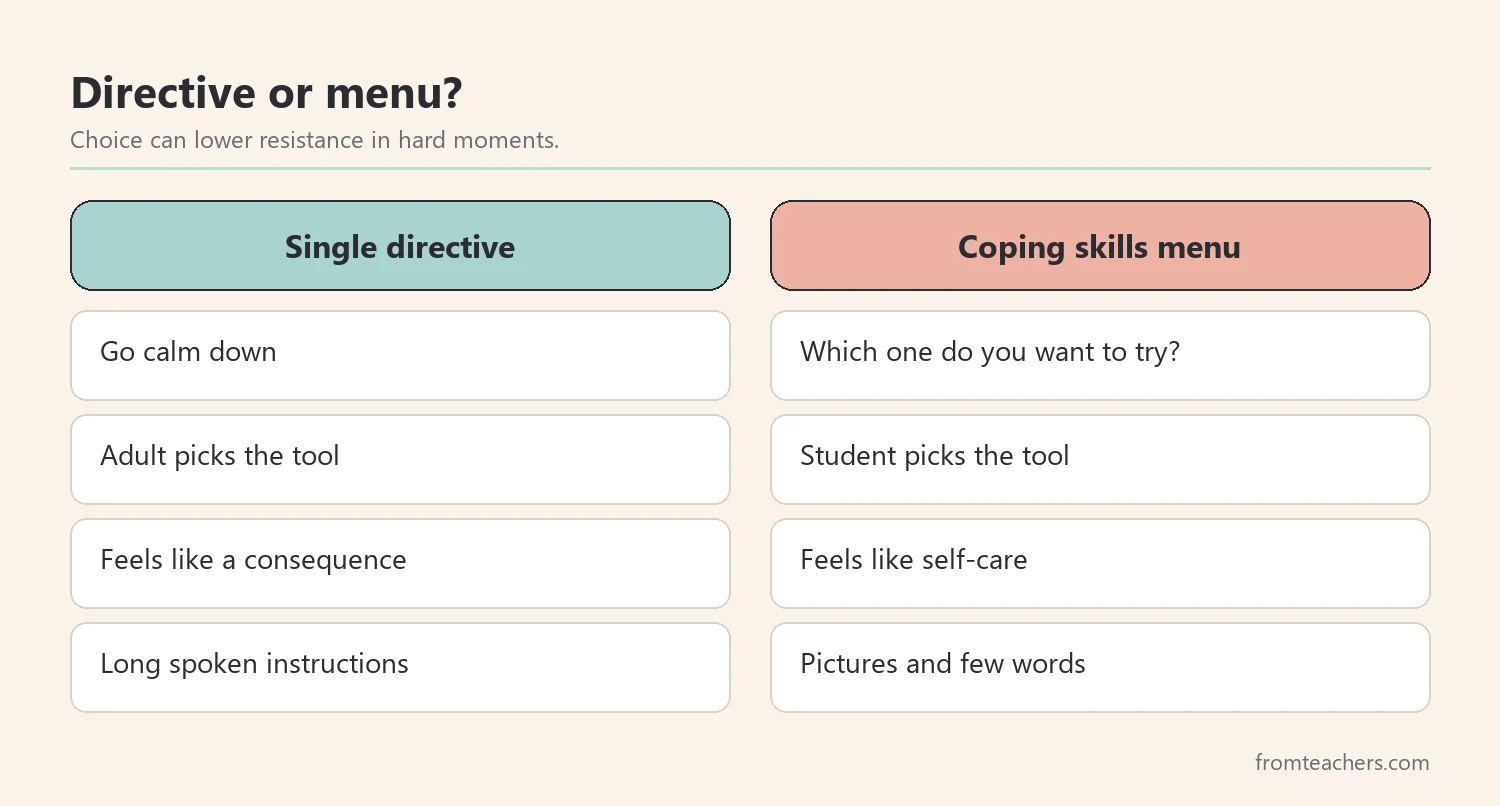
Also, frame coping as healthy. Everyone needs coping skills, including adults. Choosing a coping tool is a healthy, brave way to care for yourself. When students hear this message often, they are more likely to use the menu without feeling embarrassed.
Consider Theo, a fictional student in grade 4. Theo is competitive and quick to anger when he loses or makes a mistake. In the past, adults told him to “go calm down,” and he often refused. His counselor, Ms. Kim, and his teacher, Mr. Vega, decide to try a coping skills menu instead.
Then, observe before you build. For a week, notice what the student already does when upset. Some students pace, some hide, some seek an adult, and some want to be alone. These natural responses are clues. They show which options will feel comfortable, and they help you avoid filling the menu with tools the student will never pick.
Finally, know what the menu is not. It is not a reward chart, and it is not a consequence. It is a support tool. Students should never lose access to the menu as a punishment, because that removes the very skill you want them to use.
2. Fill the coping skills menu with six option groups
A good menu is organized, not crowded. Grouping options helps students find what they need quickly. Six groups cover most situations, and each has a few simple options.
Breathing options include slow belly breaths, breathing in for four, holding for two, and out for four, smelling the flower and blowing the candle, and tracing a shape while breathing slowly. Movement options include stretching arms or legs, wall push-ups or chair push-downs, walking slowly to a calm space, and a short exercise like marching in place.
Sensory options include noise-canceling headphones, a weighted item or lap pad, a fidget tool or stress ball, and putty, sand, or a textured item. Social options include asking a trusted adult for help, sitting near a calm friend, telling someone “I need a break,” and joining a quiet group activity.
Communication options include using a break card or signal, writing down what you are feeling, pointing to a feelings chart, and using simple words like “I’m stuck,” “I’m tired,” or “I need space.” Calm corner options include reading a short book, listening to calming music, looking at a visual schedule, and using a soft blanket or calming object.
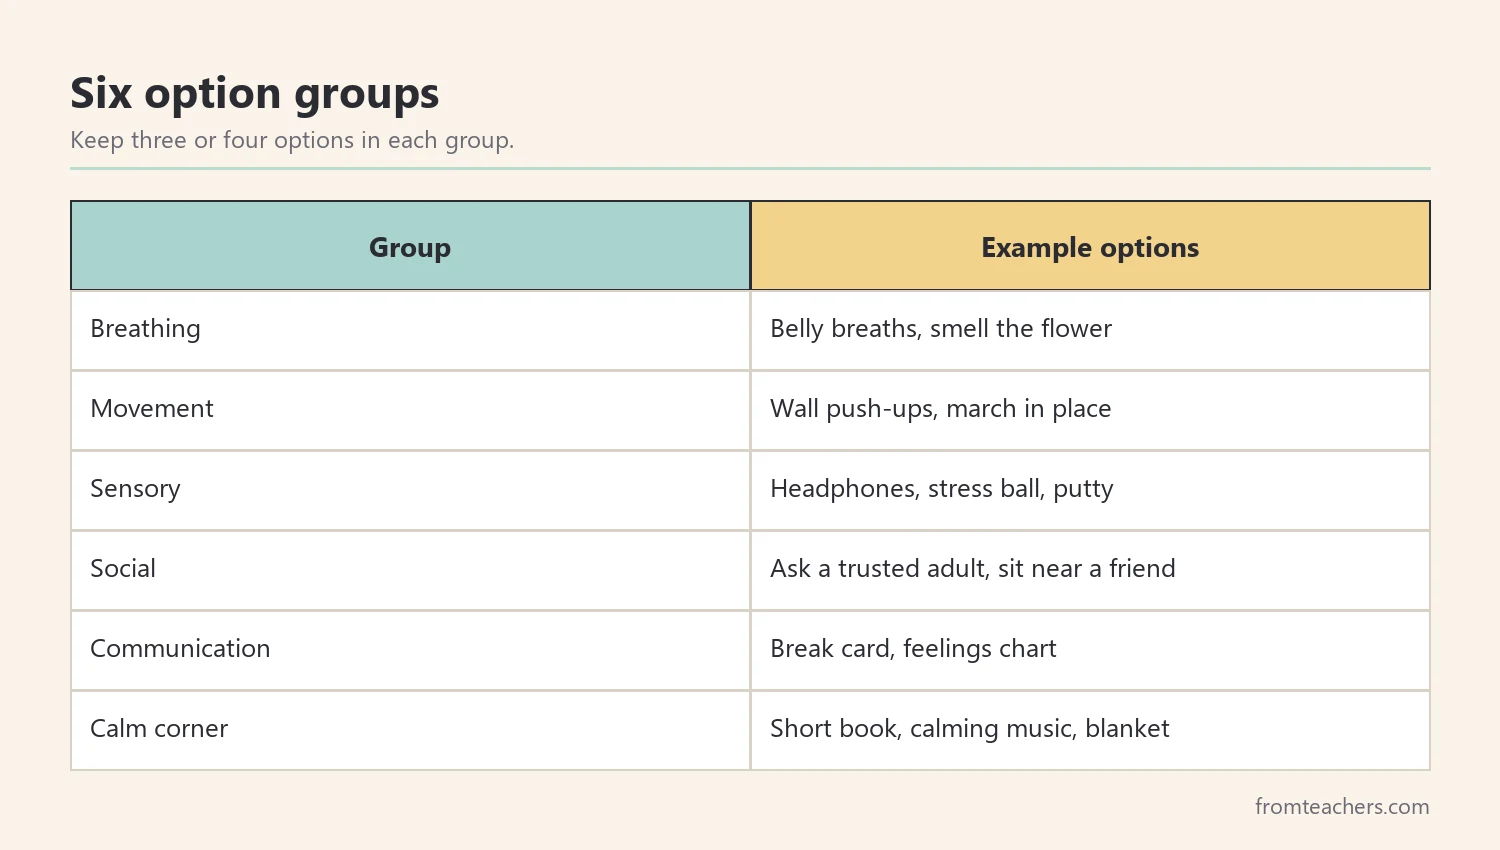
Next, use color and pictures. Color-coded groups and simple illustrations help students scan the menu fast, even when reading is hard. A bright coping skills menu poster with six color-coded option groups is a ready-made way to set this up in a calm corner or counseling office.
For Theo, Ms. Kim noticed that he responded best to movement and sensory options. So, while the full menu stayed on the wall, she highlighted wall push-ups and a stress ball as his first choices.
3. Teach each option before it is needed
A menu only helps if students know how to use each option. Trying belly breathing for the first time during a meltdown rarely works. Therefore, teach every option when students are calm.
Plan a short teaching schedule. Two groups a week is a comfortable pace. Each day, teach one option in five minutes: explain it, model it, practice it together, and talk about when it might help. By the end of three weeks, students have tried every group on the coping skills menu.
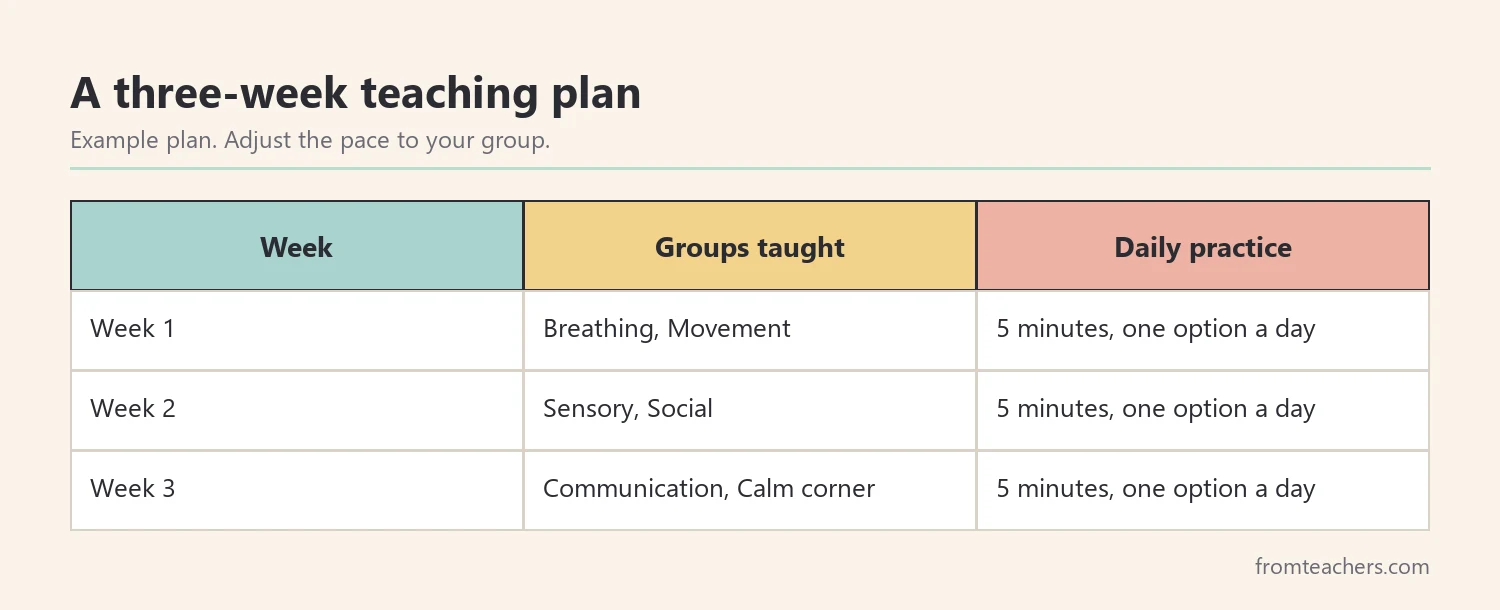
Also, let students rate each option. After practice, ask, “Did that feel calming for you?” Students can give a thumbs up, sideways, or down. These quick ratings help each student discover their favorites.
Next, teach the communication group carefully. Many students do not realize that saying “I’m stuck” or pointing to a feelings chart is a coping skill. Practice the words, and make sure adults respond quickly and kindly when students use them. Otherwise, students will stop trying.
For Theo, the communication group was the surprise. He liked having a break card he could place on his desk without speaking. During practice, he said it felt “less embarrassing than asking out loud.” That card became his most-used option.
Moreover, teach how to return to learning. Every coping option should end with a return. Teach students to check how they feel, put materials back, and rejoin the class. A clear return routine keeps the coping skills menu from becoming a way to avoid work.
4. Use the coping skills menu in the moment
When a student is upset, less is more. Use a calm voice, few words, and the menu itself. Point to it and say, “Pick one.” Then wait.
Follow a short, predictable sequence. First, notice the feeling. Then, look at the menu. Next, choose a tool and try it for a few minutes. Finally, check in and return to learning.
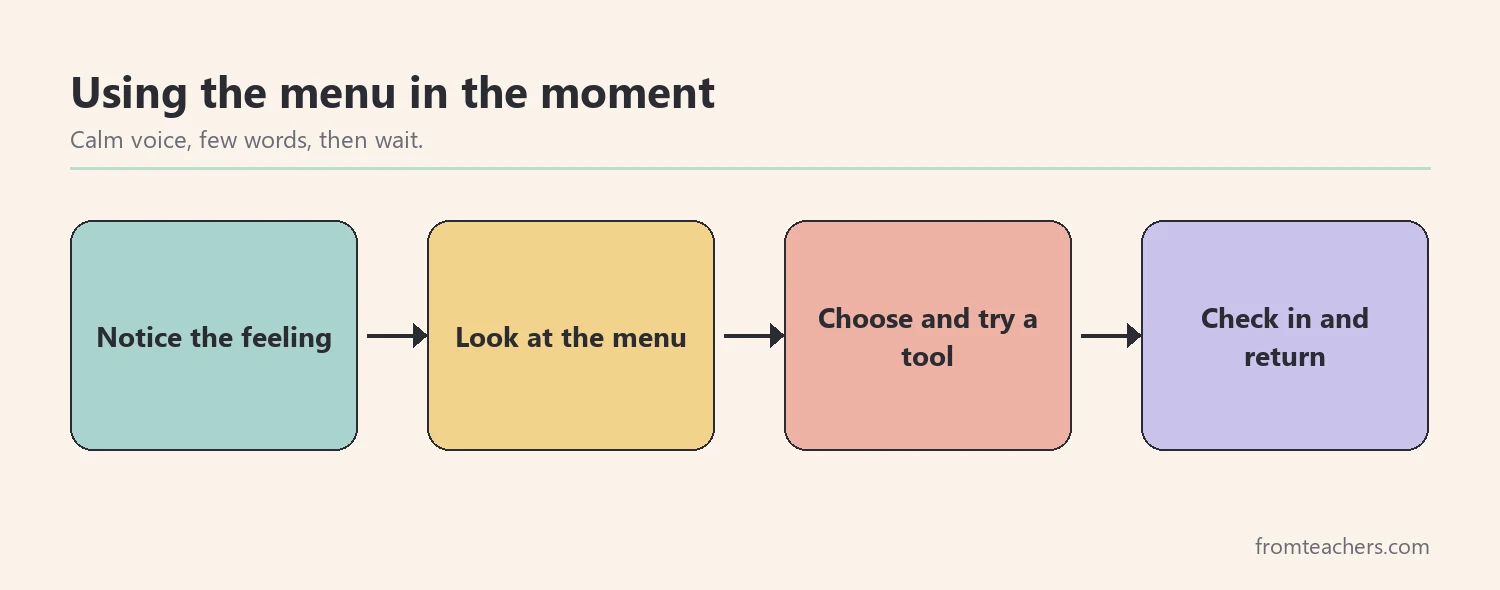
In addition, plan what adults will do. Agree as a team on the exact words to use, how long to wait before checking in, and who gives space or stays nearby. When every adult responds the same way, students learn to trust the routine. Inconsistent responses, such as one adult lecturing and another ignoring, make it harder for students to rely on the menu.
Also, keep the menu where it is needed. A large poster in the calm corner works for the whole class. A small card version on a desk or in a binder works for individual students. Some students like a menu on a lanyard or inside their planner.
Next, respect the student’s choice. If a student picks an option that seems odd to you, let them try it as long as it is safe. Choice is the point. If it does not help, they can pick another.
For Theo, the real test came at the end of a close kickball game his team lost. He stomped toward the classroom, then saw the menu by the door. He grabbed his break card, set it on his desk, and did ten wall push-ups. Mr. Vega nodded and gave him space. Five minutes later, Theo returned to his seat.
Also, accept that some moments are too big. A student in full crisis may not be able to choose. In those moments, focus on safety and calm presence. Practice and reflection come later.
5. Review and personalize the menu
Finally, learn from what happens. Over a few weeks, notice which options each student picks and which ones actually help them return to learning. Use that information to personalize the coping skills menu.
Keep a simple record. After each use, note the option and whether the student returned to learning within about ten minutes. That is enough to see patterns.
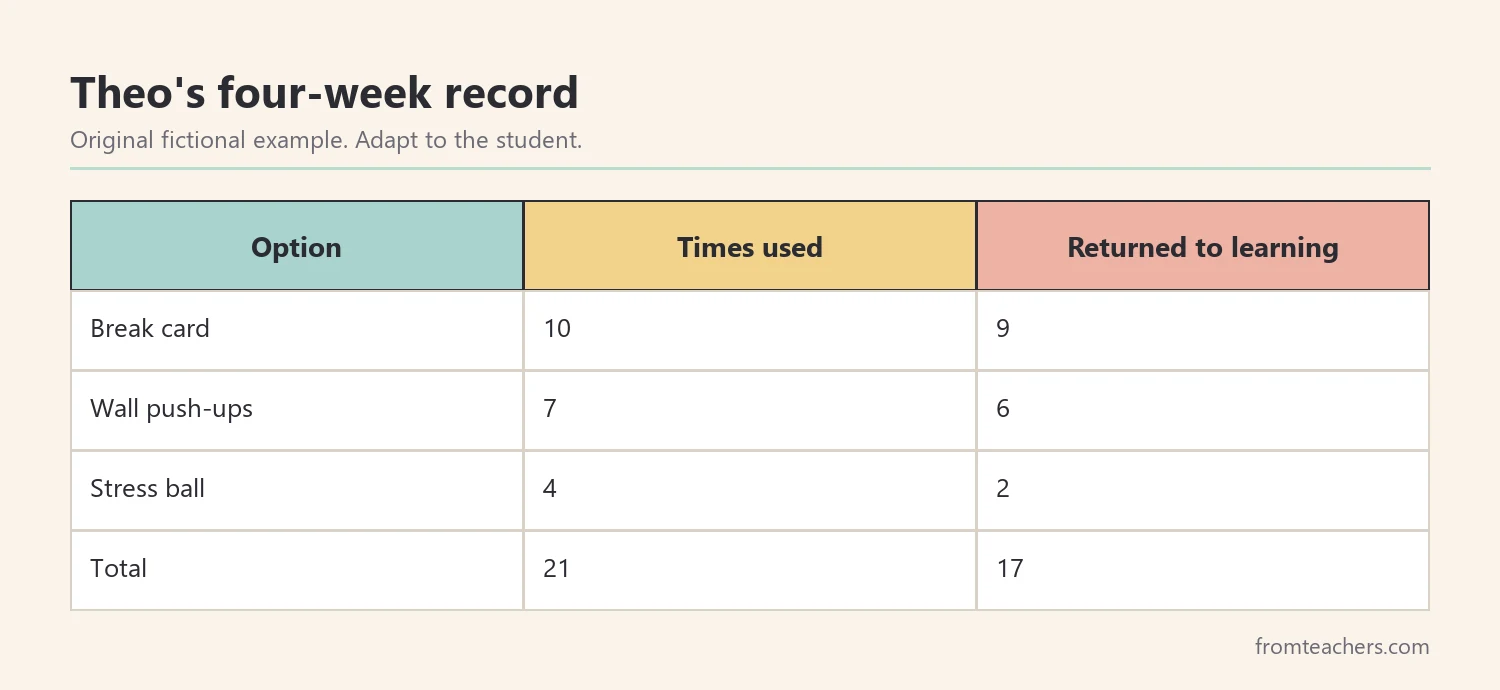
In Theo’s fictional four-week record, he used the break card 10 times and returned to learning 9 times. Wall push-ups were used 7 times, with 6 returns. The stress ball was used 4 times, with 2 returns. In total, he used 21 options, and 17 led to a return. The team moved the stress ball lower on his personal card and kept the break card at the top.
Next, involve the student in the review. Ask, “Which options helped most this month? Is there one you want to swap out?” Students who help shape their own coping skills menu use it more.
Also, celebrate the choice itself. A quiet “You chose a tool and came back. That was strong” tells the student that the effort mattered, even on a day when the tool only helped a little. Over time, this kind of feedback helps students see themselves as people who can manage hard feelings.
Moreover, share the menu with families. A copy at home with the same groups and pictures helps students use the same skills after school. Consistency across settings makes coping skills stronger.
Common mistakes and how to avoid them
- Crowding the menu. Students cannot scan it quickly. Fix: use six clear groups with a few options each.
- Introducing it during a crisis. Options feel unfamiliar. Fix: teach every option when students are calm.
- Using the menu as punishment. Students avoid it. Fix: present it as a healthy, brave choice.
- No return routine. Breaks stretch on. Fix: teach students to check in and rejoin learning.
- One menu for everyone forever. Needs change. Fix: personalize and review monthly.
Questions teachers and parents ask about a coping skills menu
How many options should a coping skills menu have?
A class menu might show six groups with three or four options each. A personal menu often works best with just three to five favorites. Fewer choices make decisions easier in hard moments.
What age is this best for?
Picture-based menus work for young children, and older students can use word-based or digital versions. Adjust the options and visuals to the student’s age and needs.
What if a student uses the menu to avoid work?
Set a time limit and teach a clear return routine. If avoidance continues, look at whether the work is too hard or the environment too stressful, and talk with the team.
What if a student refuses to pick anything?
Stay calm and wait a little longer. You can offer two choices instead of the full menu, or simply stay nearby quietly. Later, when the student is calm, talk about which option might work next time.
Can a coping skills menu be used at home?
Yes. Families can post a home version with options that fit the house, such as a quiet bedroom corner, a favorite song, or a short walk outside.
Is a coping skills menu enough for students with anxiety or big behaviors?
It is a helpful support, but some students need more, such as counseling, a behavior plan, or mental health services. The menu works alongside those supports, not instead of them.
Related reading: Building Stronger School Counseling Programs: A Framework for Student Success, Understanding Autism ADHD Meltdowns: Signs and Support Strategies, and Essential Trauma-Informed Teaching Strategies for Modern Classrooms.
A companion resource for a coping skills menu:
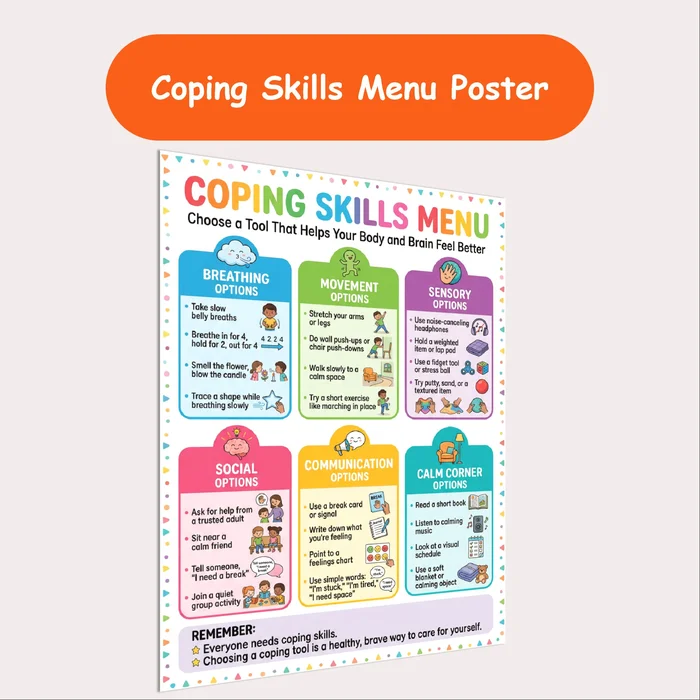
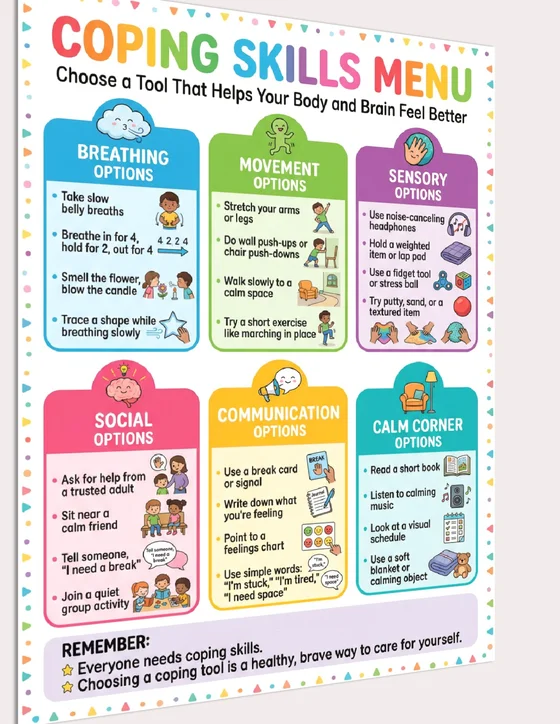
Coping Skills Menu Poster: a clear coping skills poster for kids that invites students to choose a calming tool, with six color-coded option groups for calm corners and counseling offices.
Sources and scope
- American School Counselor Association: information on school counseling and student well-being.
- CASEL: a framework for social and emotional learning, including self-management.
- National Institute of Mental Health: general information on children’s mental health.
- Understood.org: family-friendly information on emotions, frustration, and learning differences.
This guide covers everyday classroom, counseling, and home use of a coping choice menu. It does not replace counseling, mental health treatment, crisis support, or the decisions of the student’s support team.
Key takeaways
- A coping skills menu gives students choice when they feel upset.
- Organize options into six clear, color-coded groups.
- Teach every option when calm, including a return routine.
- In the moment, point to the menu, use few words, and wait.
- Review what helps and personalize the menu with the student.








Leave a Comment