

Classroom visual supports turn spoken directions, which disappear in seconds, into pictures and words that stay in view. Picture a first grade classroom at the end of center time. The teacher calls “clean up and line up,” and most students move. One student keeps building, not because he refuses, but because the words passed by before he could hold on to them.
This guide gives you a five-step method for building visual supports that actually get used. You will spot where a visual is needed, choose the right type, design it clearly, teach it like a routine, and check whether it works. Each step follows the same fictional student so you can see how small changes add up.
Examples are fictional. Adapt to the student’s goals and agreed supports. This is guidance, not a diagnosis.
At a glance
- Start with the moment that goes wrong, not with a pile of printables.
- Match the visual to the need: schedule, task steps, expectation, or calming tool.
- Keep each visual simple, consistent, and placed where the action happens.
- Teach the visual directly, then point to it instead of repeating words.
- Count one result and fade adult prompts as independence grows.
1. Spot where classroom visual supports are needed
First, find the moments when things break down. Classroom visual supports work best when each one solves a specific problem. A wall covered with charts that do not match real needs quickly becomes background noise.
A simple way to start is an alert, adjust, result approach. The alert is the struggle you notice. The adjust is the visual you add. The result is the change you hope to see. Writing all three keeps your plan focused.
| Alert | Adjust | Result to look for |
|---|---|---|
| Lost during transitions | Picture schedule | Moves to next activity with fewer prompts |
| Stuck on multi-step tasks | Task breakdown strip | Completes steps in order |
| Grabs materials from peers | Turn-taking card | Waits for a turn |
| Frustration builds quickly | Frustration meter | Names feeling before it peaks |
For example, meet Marcus, a fictional first grader. He is cheerful and loves building with blocks. However, transitions are hard. During a typical day there are 6 major transitions, and his teacher notices that he needs three or more spoken reminders at most of them.
Next, watch for a few days and note the hardest moments. Marcus struggles most when centers end and when the class moves from carpet to tables. Those two moments become the first targets.
Also, look at the whole class. Often a support built for one student helps many others too. A clear schedule, for example, reduces questions from everyone.
In addition, ask the student, when possible. Even young children can point to the part of the day that feels hardest. Their answer often confirms what you observed, and sometimes it reveals a moment you missed. Classroom visual supports built on the student’s own view tend to be used more willingly.
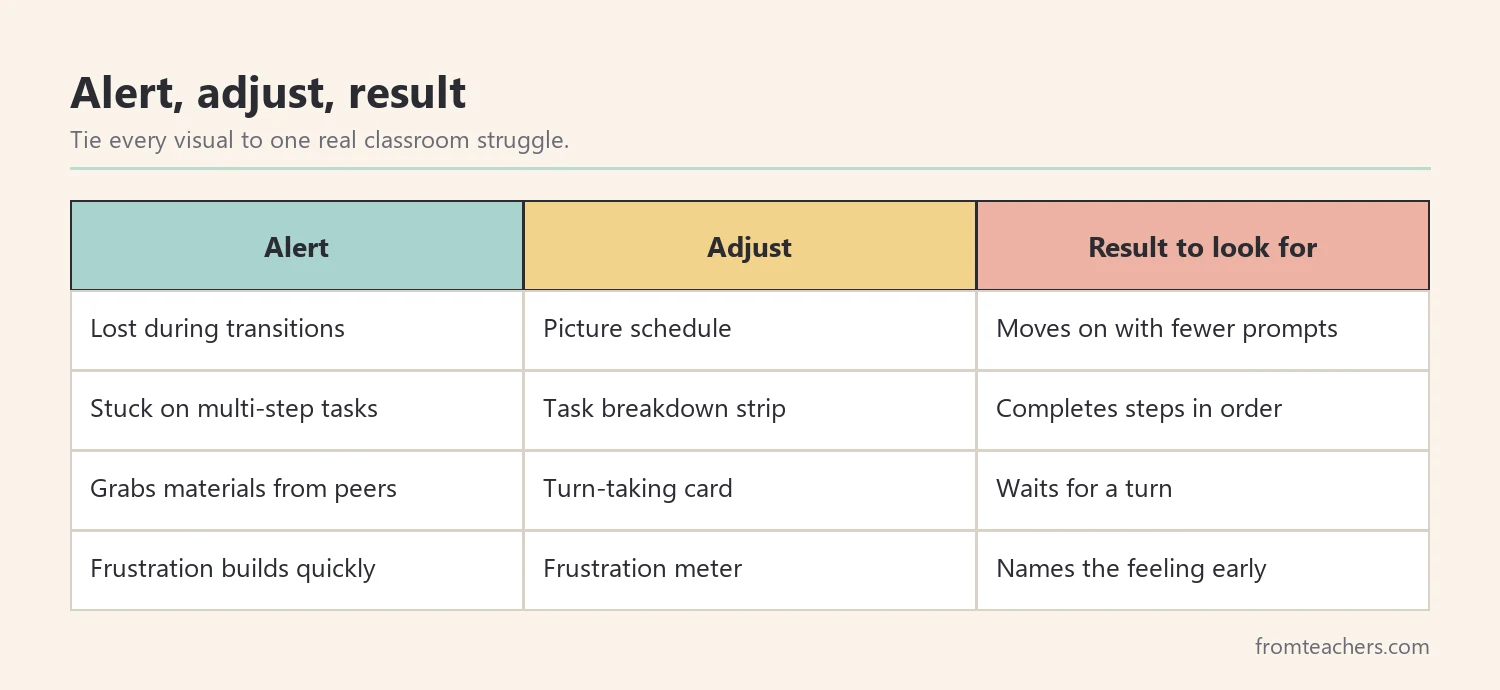
Before moving on, write your plan in one short line for each target. For example: “Alert: Marcus misses the end of centers. Adjust: first-then board. Result: lines up with one prompt or fewer.” This line becomes the reference point for every decision about classroom visual supports later in the year.
2. Choose the right type of classroom visual supports
Once you know the problem, pick a visual that fits. Different needs call for different tools. Most classroom visual supports fall into a few families.
| Family | Examples | Best for |
|---|---|---|
| Schedules | Daily schedule, first-then board | Predictability and transitions |
| Task breakdowns | Step strips, checklists, timers | Multi-step and independent work |
| Expectations | Rule posters, routine charts | Shared classroom behavior |
| Social supports | Greeting guides, turn-taking cards | Peer interaction |
| Calming supports | Calm-down charts, frustration meters | Emotional regulation |
For Marcus, the main need is transitions, so a schedule is the best fit. His teacher chooses a first-then board for center time (“First blocks, then line up”) and adds the class picture schedule at his table so he can see what comes next.
Also, think about the format. Some students do well with photos, others with simple drawings, and older students may prefer words with small icons. Ask the family or the student’s team what the student already uses at home or in therapy.
If you want a complete planning reference, the visual supports and schedules guide with 20 classroom tools organizes ideas into alert, adjust, and result tables, covering behavior, social skills, task breakdowns, and classroom expectations.
Finally, start small. One or two well-used visuals beat ten unused ones. Add more only when the first ones are working.
Similarly, think about the student’s age. Older students may feel self-conscious about a picture board that looks young. For them, classroom visual supports can take the form of a written checklist on a sticky note, a planner page, or a schedule on a tablet. The purpose stays the same, while the look matches the student.
3. Design classroom visual supports that are easy to read
A visual only helps if the student can understand it at a glance. Therefore, design matters. Keep each visual simple and consistent.
First, use one image and a few words per step. Busy pictures and long sentences slow students down. Second, use the same images across the day. If “line up” is a picture of feet on a line, keep that picture everywhere.
Third, place the visual where the action happens. A schedule on the far wall is less useful than a strip on the student’s desk. A turn-taking card belongs at the game table, and a calm-down chart belongs near the calm corner.
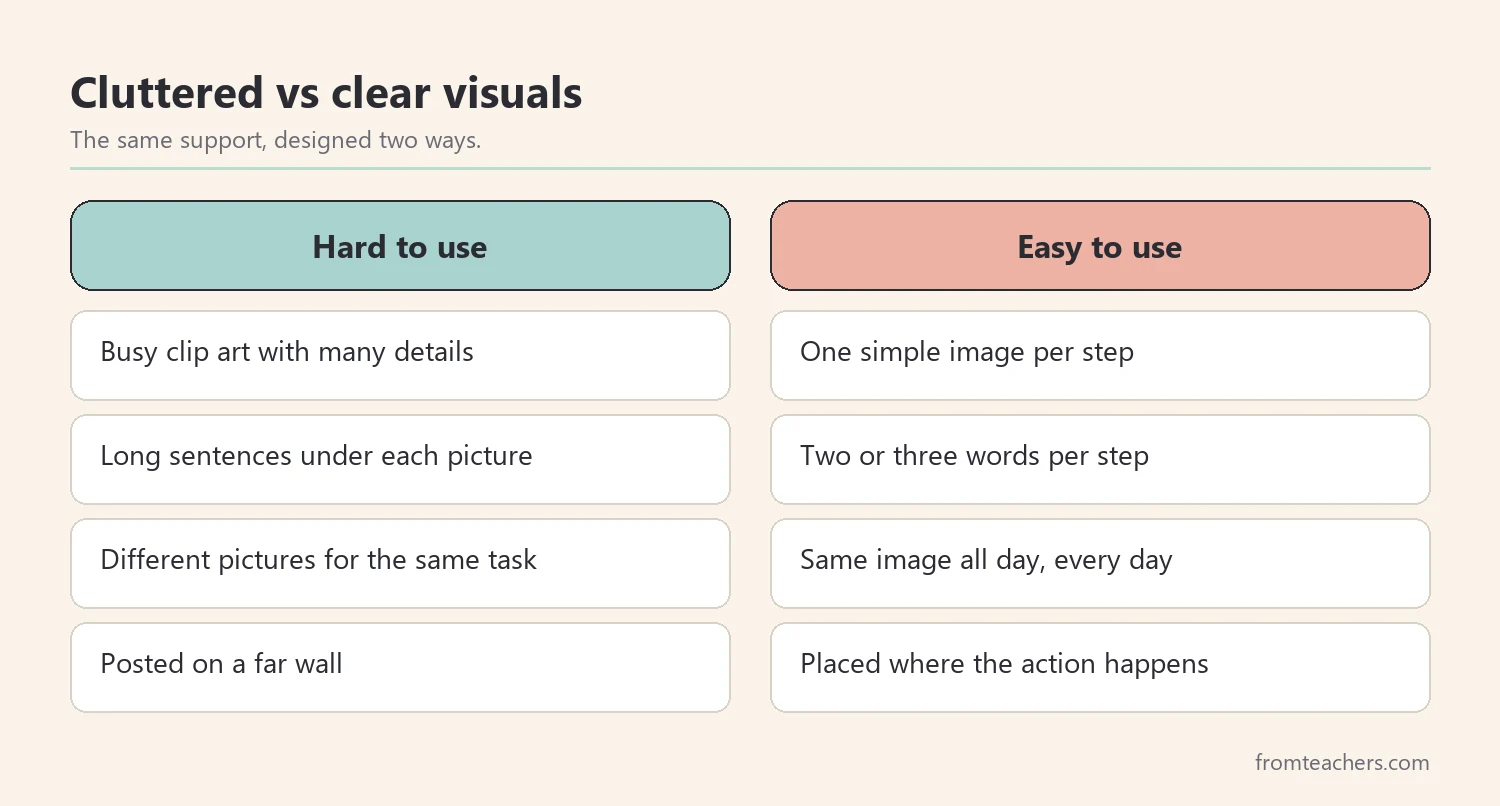
Next, make visuals durable. Laminate cards or use sheet protectors. Velcro lets students move pieces, which is helpful for first-then boards and schedules where steps get removed when done.
For Marcus, his teacher makes a small first-then board with two velcro spots. She uses the same block picture and line-up picture that appear on the class schedule. The board sits at the block center, so Marcus sees it exactly when he needs it.
Then think about color with care. A little color can help separate sections, such as morning and afternoon on a schedule. However, too many colors compete for attention. A calm, limited palette keeps the focus on the pictures and words that matter most.
Also, include the student when possible. Students who help choose pictures or decorate their schedule are often more willing to use it. Even young children can choose between two images for “snack.”
Furthermore, check readability from the student’s seat. Sit where the student sits and look at the visual. Can you see it clearly? Is it at eye level? Is it blocked by other materials? This quick test catches many problems before they affect the student.
4. Teach and use classroom visual supports consistently
Hanging a visual is not the same as teaching it. Students need to learn what each visual means and how to use it. So teach classroom visual supports the same way you teach any routine.
Start at a calm time. Show the visual, explain it in a few words, and model using it. Then let the student practice while you give feedback. For a first-then board, practice a few short, low-stakes rounds before using it during a real transition.
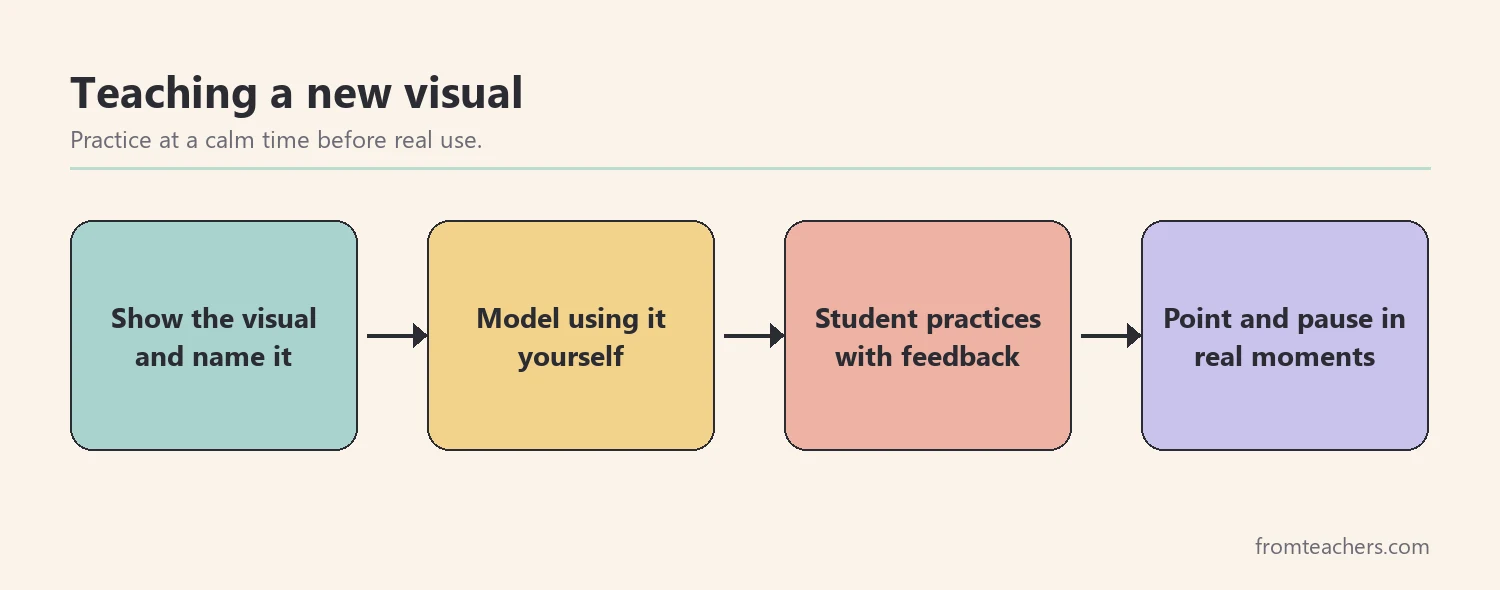
Next, point instead of talking. Once a student knows a visual, a quiet point to the board is often more effective than repeating directions. This reduces the amount of language the student must process.
Then make sure every adult uses the visual the same way. If the morning paraprofessional points to the board but the afternoon teacher gives spoken reminders, the student gets mixed signals. A short meeting or a note on the board helps keep everyone consistent.
For Marcus, his teacher practices the first-then board three times on Monday morning with a two-minute timer. By Tuesday, when centers end, she points to “then line up” and waits. Marcus looks, removes the block picture, and walks to the line.
Meanwhile, keep using classroom visual supports even on good days. Students sometimes do well because the visual is there, and removing it too early can bring the old struggles back. Fade adult prompts first, and remove the visual only when the student clearly no longer needs it.
5. Measure results and fade support
Finally, check whether the visual is working. Pick one simple measure tied to your original alert. For Marcus, the measure is how many of the 6 daily transitions he completes with one prompt or fewer.
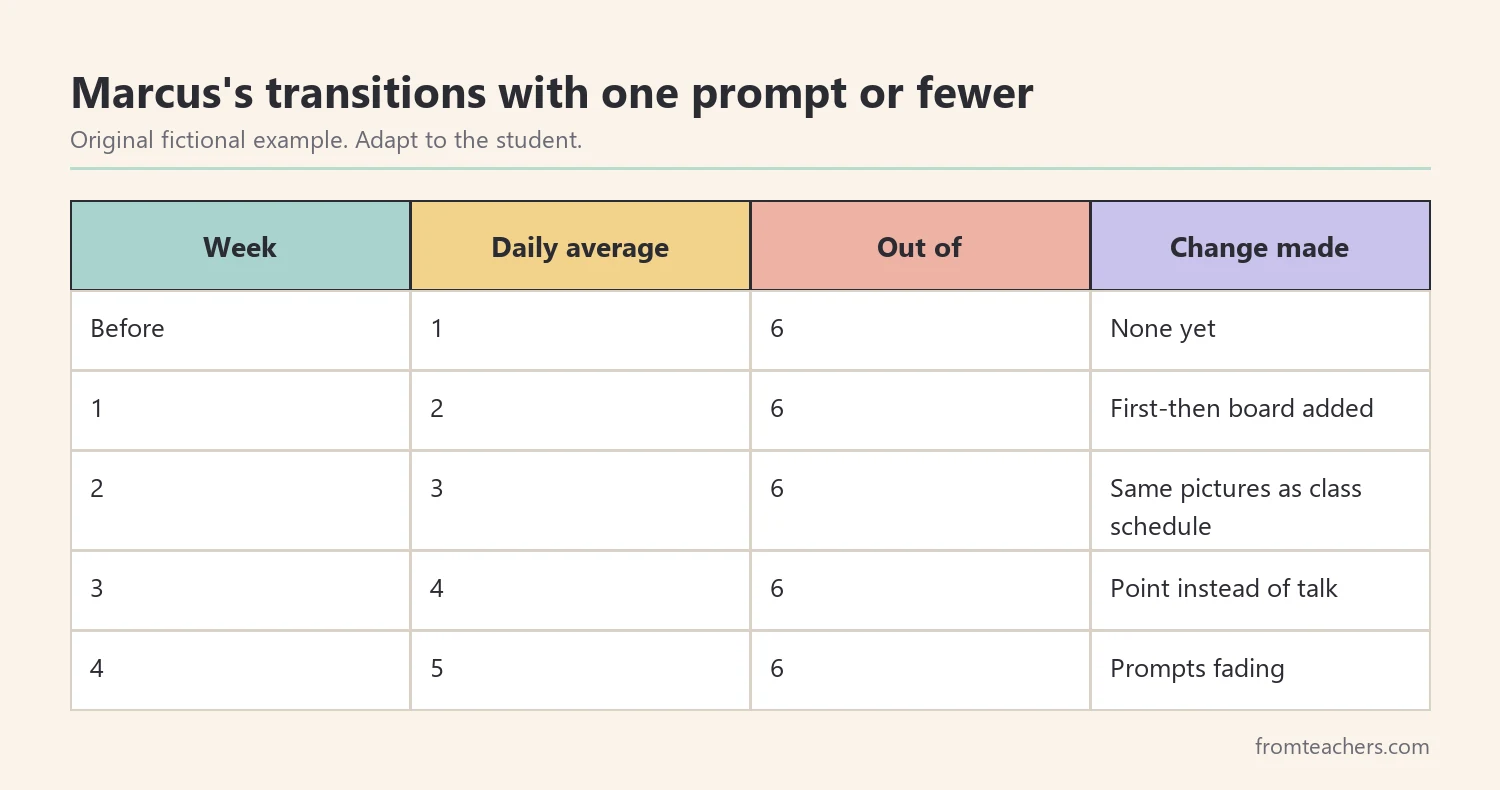
In the week before the first-then board, Marcus managed 1 of 6 transitions with one prompt or fewer, on average. In week 1 with the board, the average rose to 2 of 6. By week 2 it was 3 of 6, by week 3 it was 4 of 6, and by week 4 it was 5 of 6. The trend shows the visual is helping.
Next, fade adult support while keeping the visual. Move from pointing to a glance, then to no prompt at all. Over time, Marcus may manage his own schedule, checking it on his own.
Also, review your classroom visual supports every few weeks. Some will become unnecessary as students grow. Others may need updates when routines change, such as after a holiday break or a new seating plan. Remove what no longer helps, so the wall stays clear and meaningful.
Lastly, share results with the family. A photo of the first-then board and a quick note about progress can help the family try the same tool at home, which strengthens the skill across settings.
Finally, remember that classroom visual supports are living tools. A short review at the start of each term, asking “Which visuals are used, which are ignored, and what new needs have appeared?”, keeps your classroom clear, predictable, and supportive for every learner.
Common mistakes and how to avoid them
- Covering the walls with visuals. Too many become invisible. Fix: add visuals only for real needs and remove unused ones.
- Using different pictures for the same thing. Students get confused. Fix: keep one image per concept across the classroom.
- Posting without teaching. Students may not know what the visual means. Fix: show, model, and practice at calm times.
- Talking over the visual. Extra words compete with the picture. Fix: point and pause instead.
- Never fading prompts. Students stay dependent on adults. Fix: reduce prompts step by step while keeping the visual.
Questions teachers and parents ask about classroom visual supports
Are classroom visual supports only for autistic students?
No. Visual supports help many learners, including students with ADHD, language delays, learning disabilities, and English learners. Many supports, like a clear daily schedule, benefit the whole class.
Should I use photos or drawings?
It depends on the student. Some students understand photos more easily, while others do well with simple drawings or words. Ask the family and team what the student already recognizes.
How many classroom visual supports should one student have?
Start with one or two that solve the biggest problems. Add more only when those are working well. Too many visuals at once can overwhelm a student.
How long before a visual support starts working?
Many students respond within a week or two if the visual is taught and used consistently. Track one simple measure so you can see the trend. If nothing changes after a few weeks, check consistency and design before switching tools.
Can parents use visual supports at home?
Yes. Morning routines, bedtime steps, and first-then boards work well at home. Using the same pictures as school helps the student connect the two settings.
Related reading: Autism Spectrum Disorder Guide, Moving Beyond Shame and Behavior Charts, and Special Education Strategies.
A companion resource for classroom visual supports:
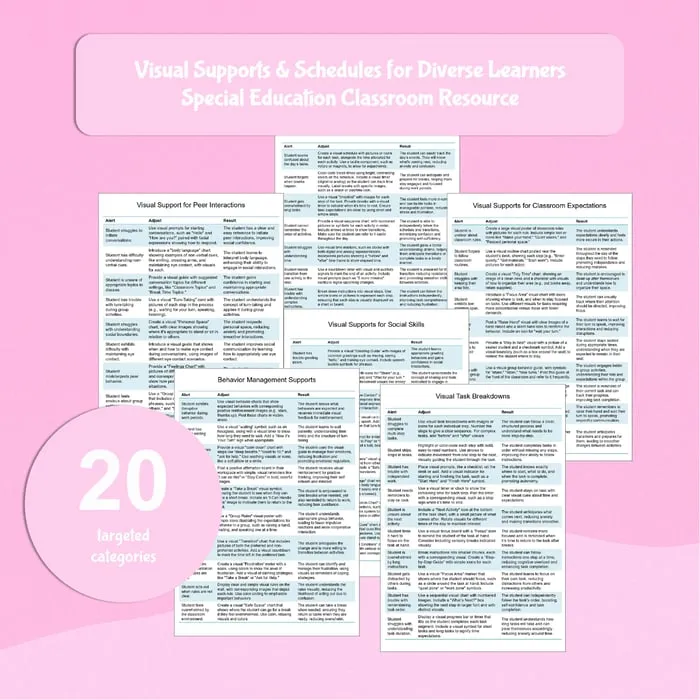
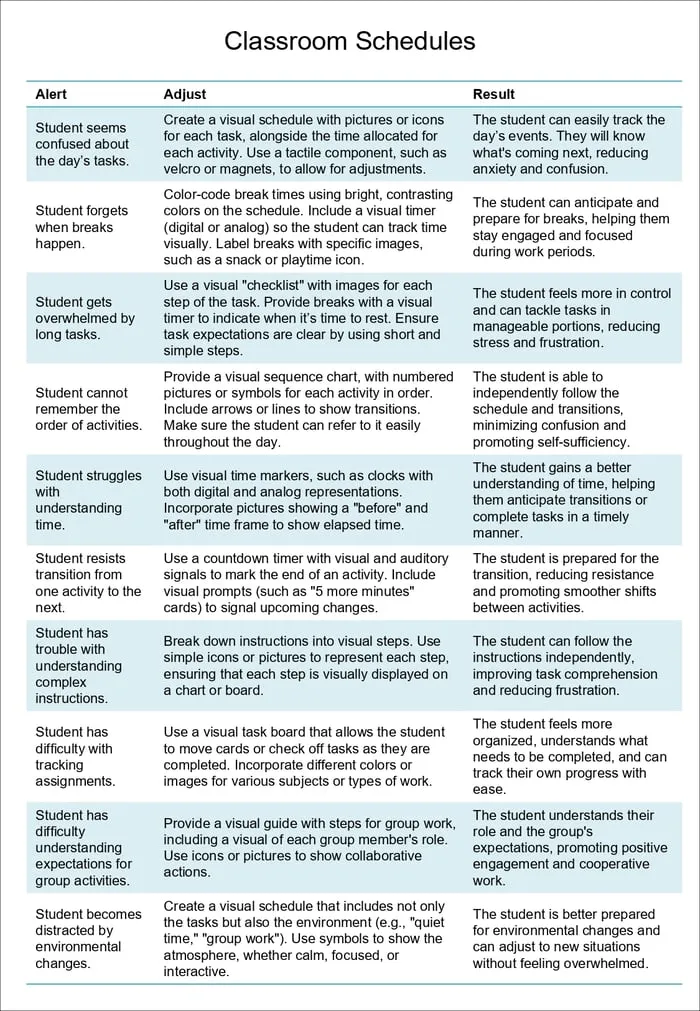
Visual Supports and Schedules: 20 Classroom Tools: 20 alert, adjust, and result tables covering peer interactions, social skills, behavior management supports such as calm-down charts and frustration meters, visual task breakdowns, and classroom expectations.
Sources and scope
- IRIS Center, Vanderbilt University: free modules on autism, classroom behavior, and evidence-based practices.
- CAST UDL Guidelines: a framework for offering multiple ways to represent information.
- Understood.org: practical articles for families and teachers on learning and thinking differences.
- IDEA, U.S. Department of Education: the law behind IEPs, accommodations, and special education services.
This guide covers planning and using visual supports in everyday classrooms. It does not cover formal communication systems or assessment, which should be planned with speech-language pathologists and the student’s team.
Key takeaways
- Build classroom visual supports around specific moments that go wrong.
- Choose the visual family that matches the need.
- Design simply, use consistent images, and place visuals where action happens.
- Teach each visual directly and point instead of repeating words.
- Track one result and fade adult prompts over time.










Leave a Comment