

A life skills toolkit helps most when a student is standing at the counter, holding a slice of bread, and has no idea what comes next. Maybe the adult jumps in and finishes the sandwich. Maybe the student waits, looks around, and gives up. In both cases the skill stays out of reach, and the next attempt looks exactly the same.
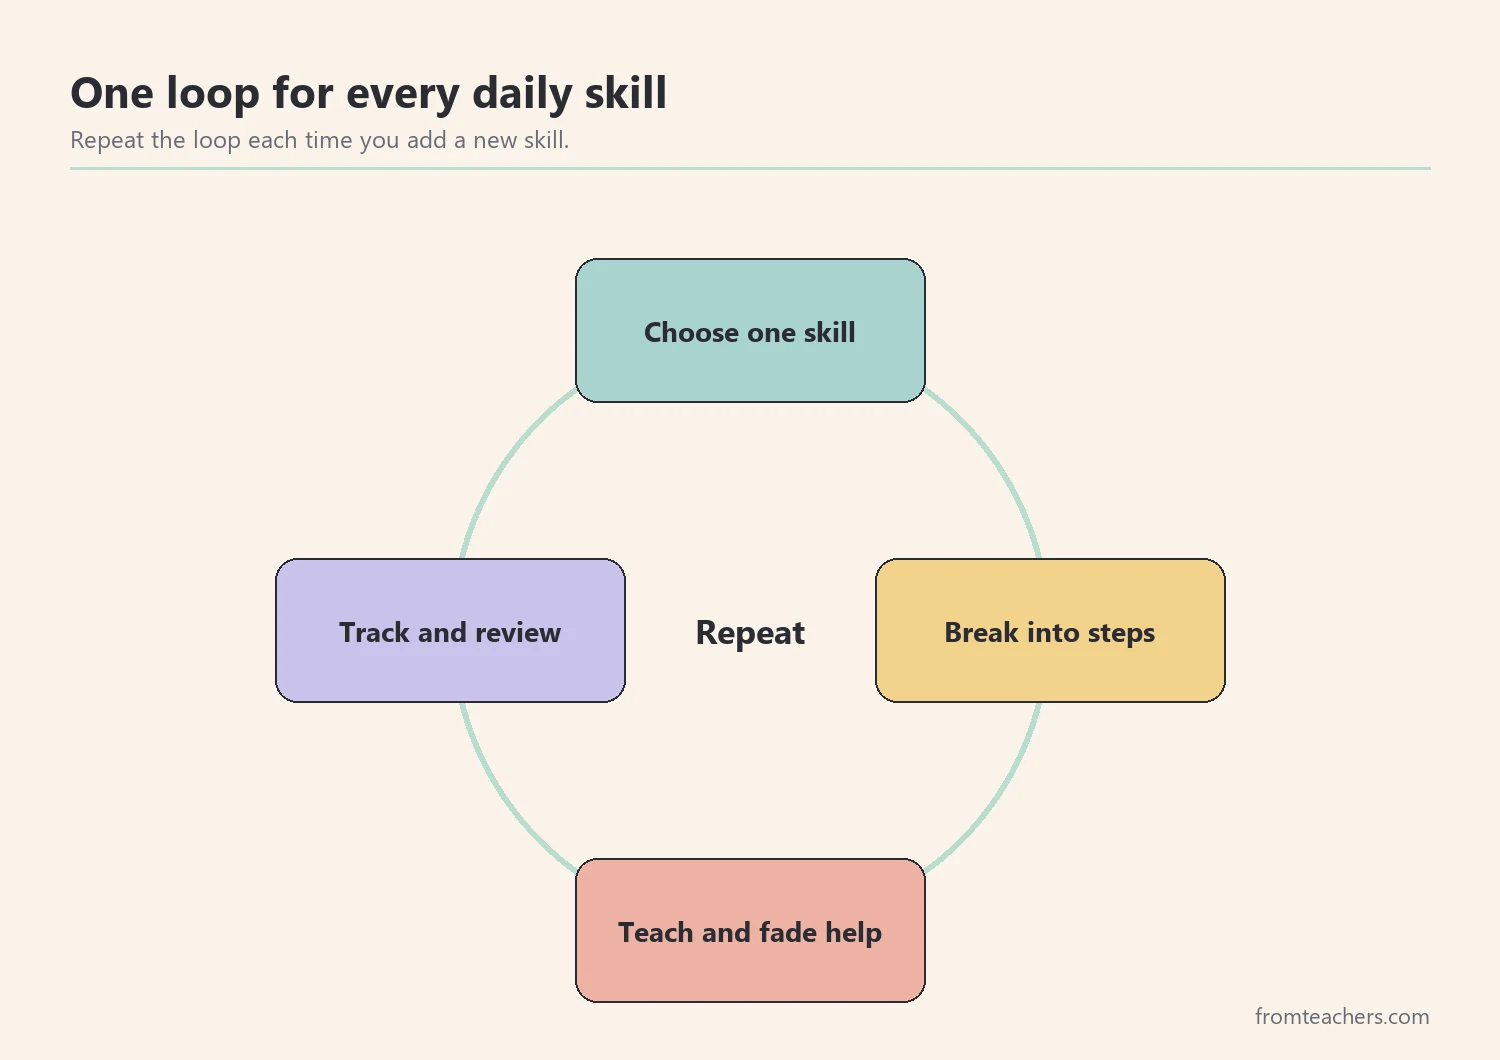
This guide walks you through a five-step process for teaching daily living skills like cooking, hygiene, dressing, chores, and money. By the end, you will know how to choose one skill, break it into small visual steps, teach it with prompts that fade, practice it in real places, and track progress so independence actually grows over time.
Examples are fictional. Adapt to the student’s goals and agreed supports. This is guidance, not a diagnosis.
At a glance
- Pick one skill that matters in the student’s daily life right now.
- Break the skill into short, visible steps the student can follow.
- Teach with the least help needed, then fade that help on purpose.
- Practice in the real kitchen, bathroom, or store, not only at a desk.
- Record independent steps each week and adjust one thing at a time.
1. Choose one skill with your life skills toolkit
Every life skills toolkit covers more ground than a student can learn at once. Dressing, hygiene, chores, meal preparation, money, and technology are all important. However, trying to teach six areas in the same month usually means none of them sticks. So the first step is narrowing the focus to one skill.
Start by asking three questions. First, which skill would make the biggest difference in the student’s day? Second, which skill comes up often enough to practice several times a week? Third, which skill does the student or family care about most? The answer that shows up in all three is usually your starting point.
For example, meet Jordan, a fictional 15-year-old in a high school life skills class. Jordan can name foods he likes and can spread peanut butter when an adult hands him the knife. Still, he cannot make a snack without help from start to finish. His family says lunch prep on weekends is a daily struggle. At school, the class kitchen is open four days a week. Because of that, making a simple sandwich becomes Jordan’s first target.
| Question | Jordan’s answer |
|---|---|
| Biggest daily impact? | Making his own lunch |
| Practice often? | Class kitchen, four days a week |
| Student and family care? | Yes, weekend lunches are hard |
Next, write the goal in plain words the whole team can share: “Jordan will make a sandwich using a picture recipe card.” That sentence tells the teacher, aide, and family exactly what success looks like. Later, you can add new skills from the same life skills toolkit once this one is steady.
2. Break the skill into small visual steps
Once you have a skill, the next move is a task analysis. That simply means listing every small action from start to finish, in order. A skill that looks simple to an adult often hides eight or ten separate decisions. When those steps stay invisible, the student has to guess, and guessing is where help creeps back in.
To build a task analysis, do the skill yourself slowly and write down each action. Then cut anything the student already does well into a single step, and split any hard part into two. Keep each step short enough to fit on one picture card. Finally, check the list by watching a peer or colleague follow it exactly as written.
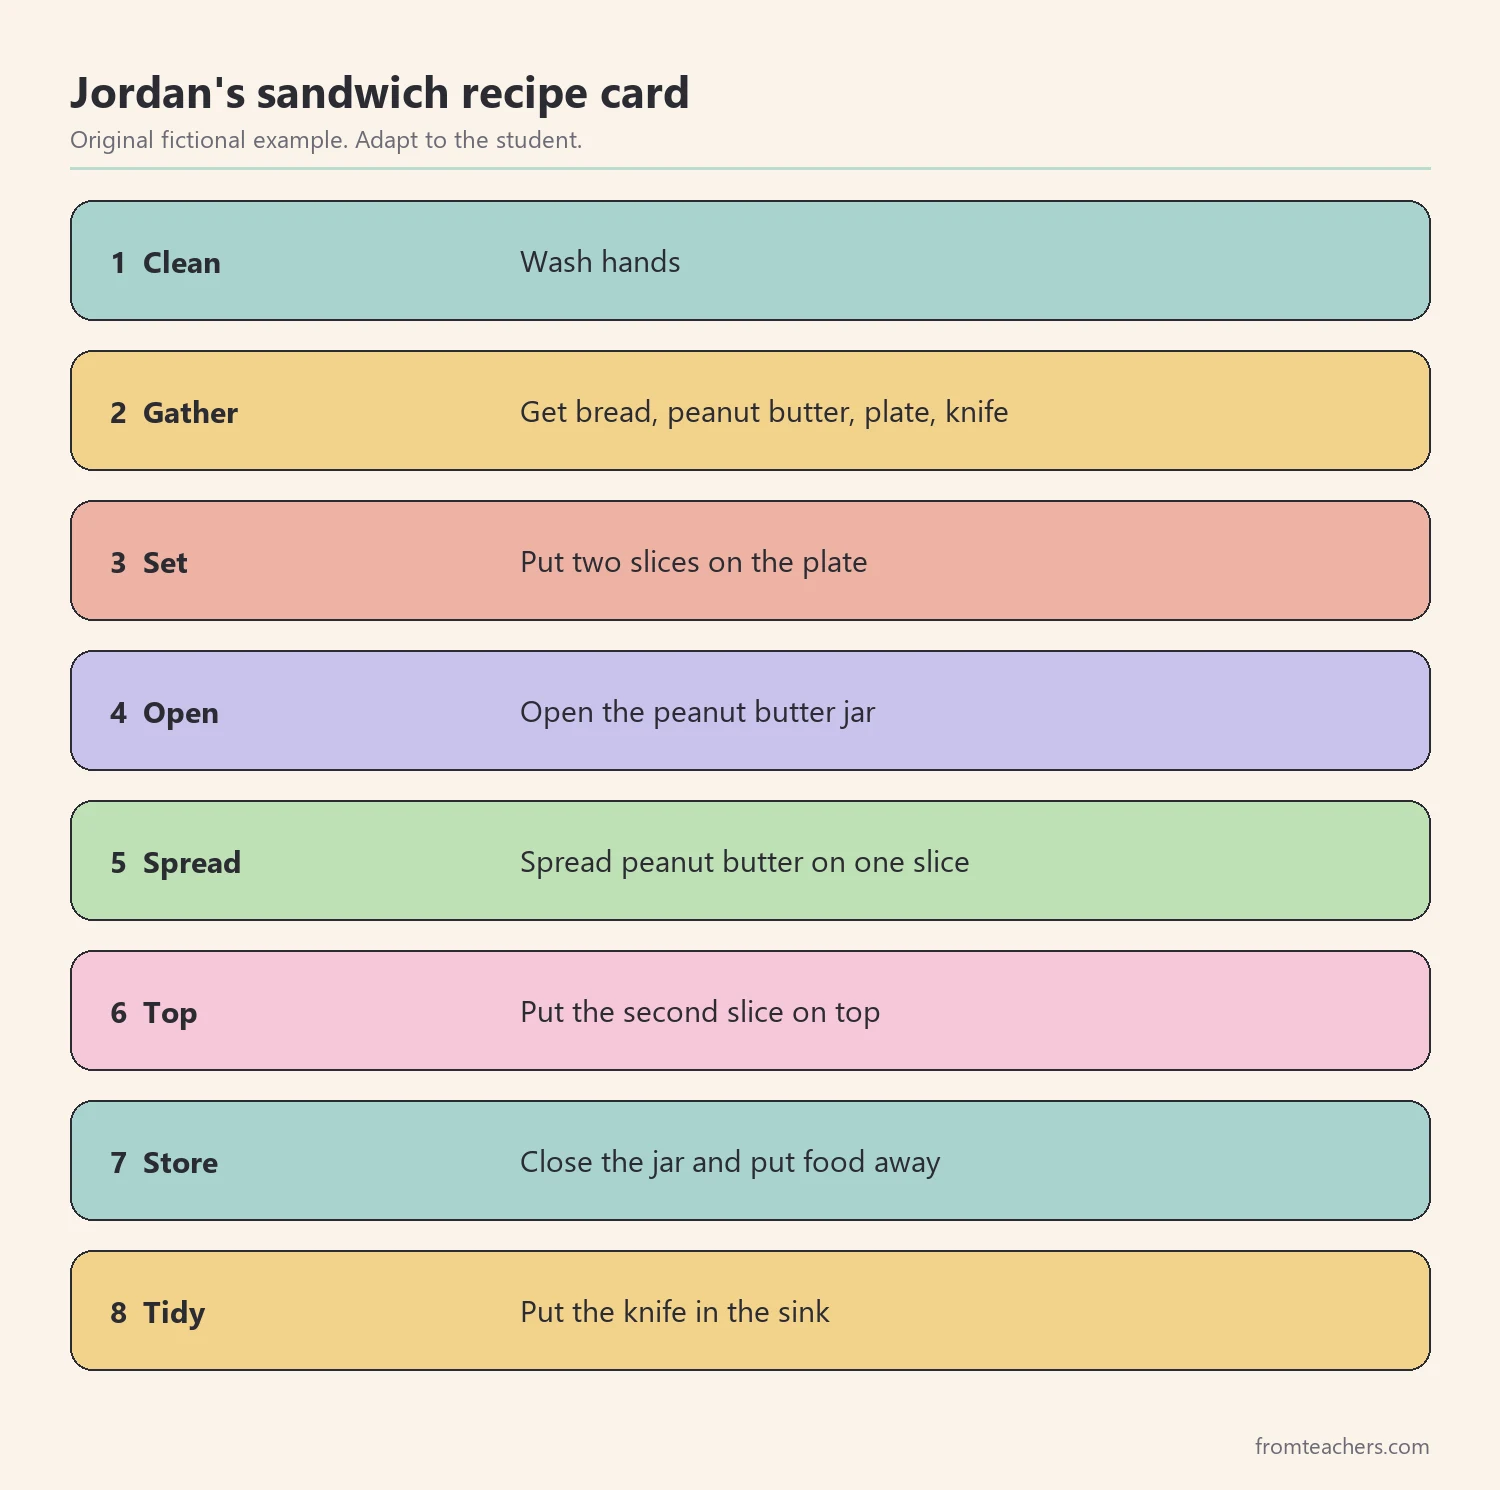
Jordan’s sandwich became eight steps:
- Wash hands.
- Get bread, peanut butter, plate, and knife.
- Put two slices of bread on the plate.
- Open the peanut butter jar.
- Spread peanut butter on one slice.
- Put the second slice on top.
- Close the jar and put food away.
- Put the knife in the sink.
Each step went onto a picture recipe card with one photo and three to five words. In addition, the cards were numbered so Jordan could point to where he was. A well-built life skills toolkit gives you this kind of structure for many areas at once, which saves hours of drafting. Even so, adjust any life skills toolkit card to match the student’s own kitchen, tools, and words.
Meanwhile, keep the same steps for every adult. If the aide teaches “bread first” and the parent teaches “plate first,” the student is learning two routines instead of one. A single printed card in the kitchen and a copy at home solves this quickly.
3. Teach the life skills toolkit steps with fading prompts
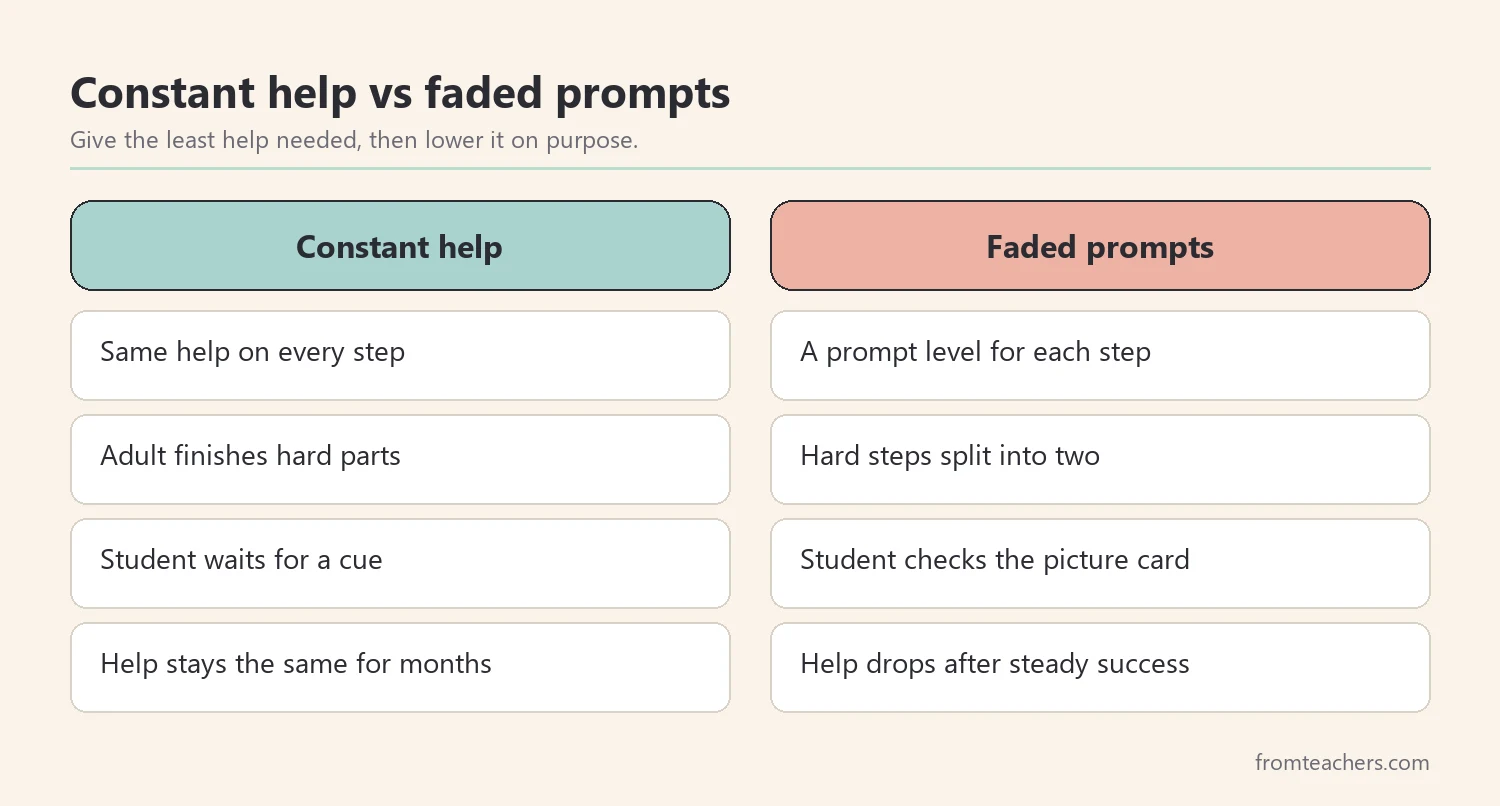
With the steps written, teaching can begin. The key idea is to give only as much help as the student needs to succeed, then reduce it on purpose. Help that never fades turns into a habit, and the student learns to wait for it.
Think of prompts as a ladder. At the top is full physical help, such as hand over hand. Below that are a light touch, a model, a gesture toward the card, and a short verbal cue. At the bottom is no prompt at all. Generally, start one level above what the student needs, and step down as soon as two or three tries in a row go well.
For Jordan, the team noticed he could do steps 1 through 3 with a point to the card. Spreading peanut butter needed a model first. Closing the jar and cleaning up needed only a verbal cue. So each step got its own level, not one level for the whole routine. That small change made practice faster and less frustrating. A good life skills toolkit makes room for this kind of step-by-step decision instead of one rule for every task.
Also, pay attention to the reason behind a hard step. Some students struggle with sequencing, others with fine motor control, attention, or sensory discomfort. For example, a student who avoids teeth brushing may dislike the taste of the toothpaste, not the routine itself. Ready-made tables like the ones in the Functional Life Skills Toolkit with 20 skill areas pair a common barrier with a practical plan and the reasoning behind it, which helps you pick the right fix instead of adding more prompts.
Finally, praise effort and independence specifically. “You opened the jar by yourself” teaches more than “Good job.” Over time, that kind of feedback helps the student notice their own progress.
4. Practice in real settings
A skill practiced only at a desk often stays at the desk. Students learn best when they use the real sink, the real store, and the real washing machine. Therefore, plan practice in the place where the skill will actually be used whenever you can.
Start in a calm, predictable setting, like the classroom kitchen before other students arrive. Once the student is steady there, add small changes: a different brand of bread, a new plate, or a busier room. This is called generalization, and it is what turns a classroom routine into a life skill. In fact, each small change is a mini test of whether the student truly owns the steps.
Home practice matters just as much. Send a copy of the picture card home and a short note about which steps are independent. Ask the family to try the routine once or twice a week and to use the same words the school uses. Then, invite them to share what they notice, even a single sentence. When families see the same life skills toolkit pages at school and at home, the routine feels familiar instead of new.
Jordan practiced his sandwich in the class kitchen four days a week. After three weeks, his family taped the recipe card inside a kitchen cabinet at home. On Saturdays, he made his own lunch while a parent stayed nearby but did not step in unless asked. Soon, the family reported that he reached for the card himself.
| Setting | What changes | Support |
|---|---|---|
| Class kitchen, quiet | Nothing new | Card plus prompts |
| Class kitchen, busy | Noise and peers | Card only |
| Home kitchen | New tools and layout | Card, parent nearby |
As the routine becomes steady, use your life skills toolkit to pick a related next skill. For instance, after a sandwich, packing a lunch bag or wiping the counter is a natural extension that reuses many of the same steps.
5. Track independence and review the life skills toolkit plan
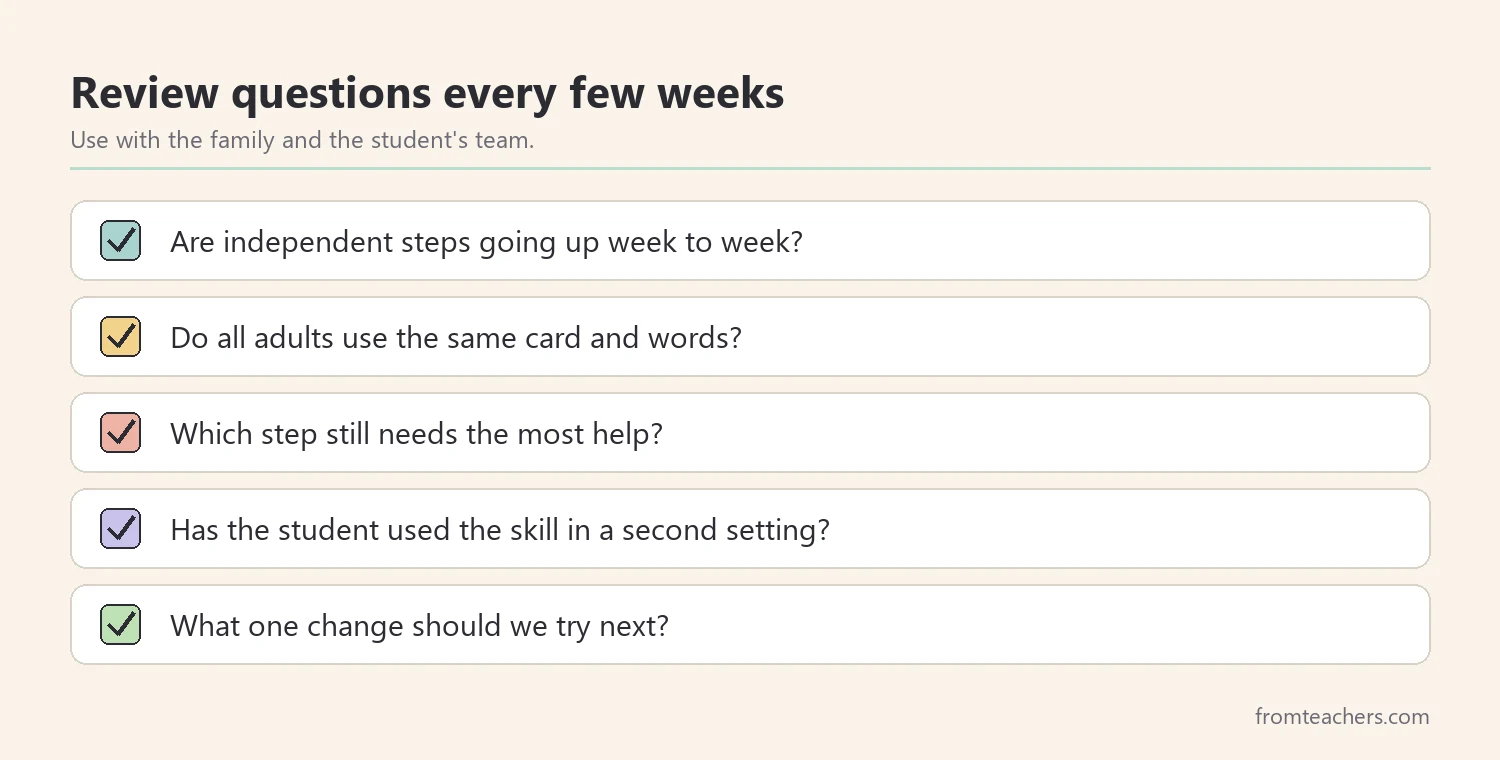
Progress in daily living skills can feel slow, so data keeps everyone honest and encouraged. The simplest measure is how many steps of the task analysis the student completed without any prompt. Record it once or twice a week, not every single day.
A simple table works well. List the week, the number of independent steps out of the total, and one short note about what changed. Afterward, look for a trend over three or four weeks rather than reacting to a single hard day.
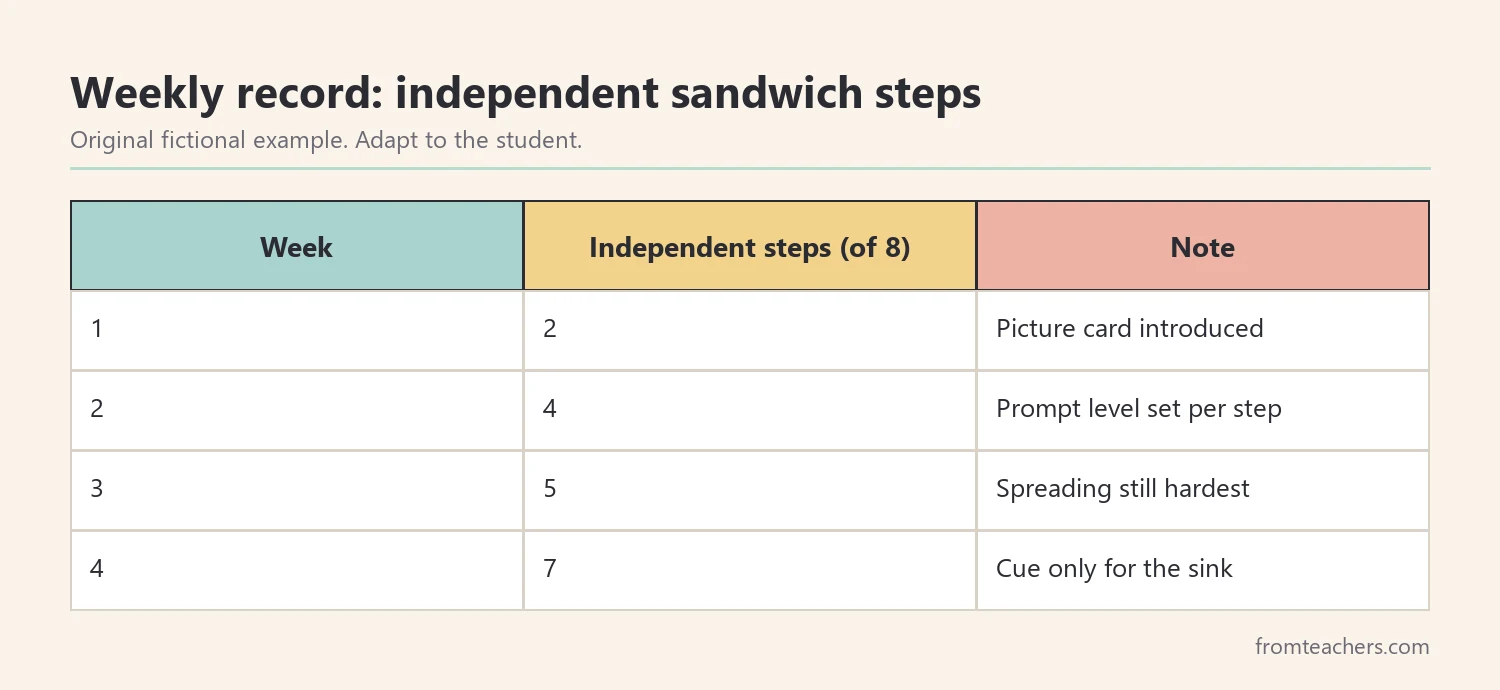
Jordan started with 2 of 8 steps independent in week 1. By week 2, he reached 4 of 8 after the team set a separate prompt level for each step. In week 3, he reached 5 of 8, with spreading still the hardest part. By week 4, he completed 7 of 8 steps on his own, needing a cue only to put the knife in the sink.
When the numbers stall, change one thing at a time. You might split a hard step in two, change a tool, or adjust the picture card. In contrast, changing everything at once makes it impossible to know what helped. Review the data with the family and, where appropriate, with the student, who often enjoys seeing the numbers grow.
Once a skill reaches near full independence across settings, keep a short maintenance check every few weeks. Then return to your life skills toolkit and choose the next area, using the same loop.
Common mistakes and how to avoid them
- Teaching too many skills at once. Fix: choose one skill, reach steady independence, then add the next.
- Steps that are too big. Fix: if the student stalls at the same point, split that step into two smaller ones.
- Help that never fades. Fix: set a prompt level for each step and lower it after a few successful tries in a row.
- Practice only at a desk. Fix: move practice into the real kitchen, bathroom, or store as soon as possible.
- Different adults, different routines. Fix: share one printed card and the same words across school and home.
- No record of progress. Fix: count independent steps once or twice a week and review the trend monthly.
Questions teachers and parents ask about a life skills toolkit
What skills should a life skills toolkit include?
Most cover daily living areas such as dressing, personal hygiene, household chores, meal preparation, money management, and using technology. The best choice for one student depends on their age, goals, and daily routines. Start with the skill that matters most right now.
How long does it take to teach one daily living skill?
It varies widely from student to student. Some routines become steady in a few weeks, while others take months. Tracking independent steps each week helps you see real progress even when it feels slow.
Can a life skills toolkit be used at home?
Yes. In fact, home practice is often where independence becomes real. Share the same picture cards and words the school uses so the student is not learning two different routines.
What if the student refuses a task?
Look for the barrier behind the refusal. A sensory issue, a confusing step, or too much help can all cause avoidance. Adjust that one barrier, keep the task short, and end on a success.
When should we move on to a new skill?
Generally, move on when the student completes the routine with little or no help across at least two settings. Keep a brief maintenance check every few weeks so the skill does not fade.
Related reading: Navigating the Path to Adulthood: Building Essential Life Skills, Dignity in Daily Care: Respectful Approaches to Toileting and Personal Hygiene for Older Autistic Students, and Building Workplace Readiness: Essential Skills for Career Success.
A companion resource for a life skills toolkit:

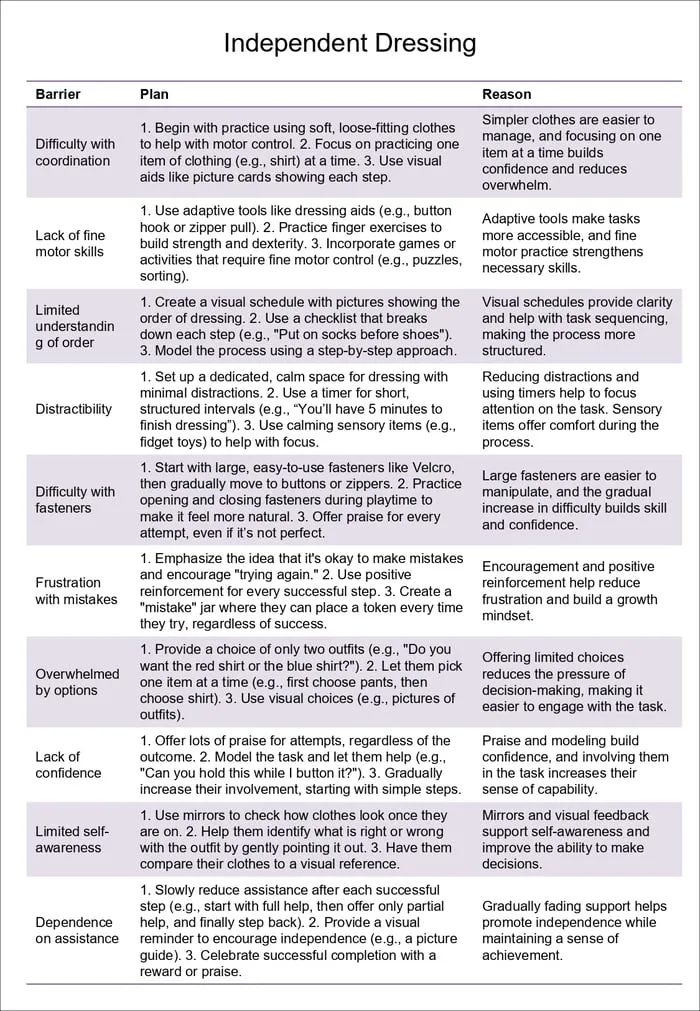
Functional Life Skills Toolkit: 20 Areas: twenty skill areas, including dressing, hygiene, household chores, meal preparation, money management, and technology, each with a common barrier, a step-by-step visual plan, and the reasoning behind it.
Sources and scope
- IDEA, U.S. Department of Education: the law behind special education services, IEPs, and transition planning.
- IRIS Center, Vanderbilt University: free modules on evidence-based practices, including instruction and prompting.
- National Technical Assistance Center on Transition: resources on preparing students with disabilities for life after school.
- Understood.org: practical articles for families and teachers on learning and thinking differences.
This guide covers everyday teaching steps for daily living skills at school and home. It does not cover medical, occupational therapy, or formal evaluation decisions, which belong to qualified professionals and the student’s team.
Key takeaways
- Use your life skills toolkit to choose one meaningful skill at a time.
- Break the skill into short picture steps everyone follows the same way.
- Set a prompt level for each step and fade it on purpose.
- Practice in real settings and share the routine with the family.
- Count independent steps weekly and change one thing when progress stalls.








Leave a Comment