

A SEN student observation shows you how a child with special educational needs actually experiences a lesson, not just how they perform on a test. Picture a support teacher who visits for five minutes during a calm story time. She writes “settled and engaged,” yet twenty minutes later the same student is hiding under the desk during a writing task.
This guide shows you how to observe a full class period in five steps: set a purpose, record the setting and participation, track behavior and regulation, check academic support, and turn notes into recommendations. By the end, you will be able to plan and run an observation that gives your team fair, useful evidence.
Examples are fictional. Adapt to the student’s goals and agreed supports. This is guidance, not a diagnosis.
At a glance
- A full lesson shows patterns that a short visit misses.
- Decide your purpose before you walk into the room.
- Record what you see, and keep interpretations separate.
- Check whether planned supports are actually being used.
- End with a few clear, practical recommendations.
1. Set a clear purpose for the SEN student observation
First, decide why you are observing. Are you checking a new support, gathering evidence for a review meeting, or exploring a concern from the family? A clear purpose keeps your notes focused, because nobody can record everything at once.
Next, talk briefly with the class teacher. Ask what the lesson will include and whether anything has changed recently, such as a new seating plan or a substitute. Then agree on where you will sit. A spot to the side, with a clear view of the student, usually works best.
Also, review the student’s current plan before the visit. Know their targets, their agreed supports, and any known triggers. That way, you can notice whether supports are used, not just whether the student is coping.
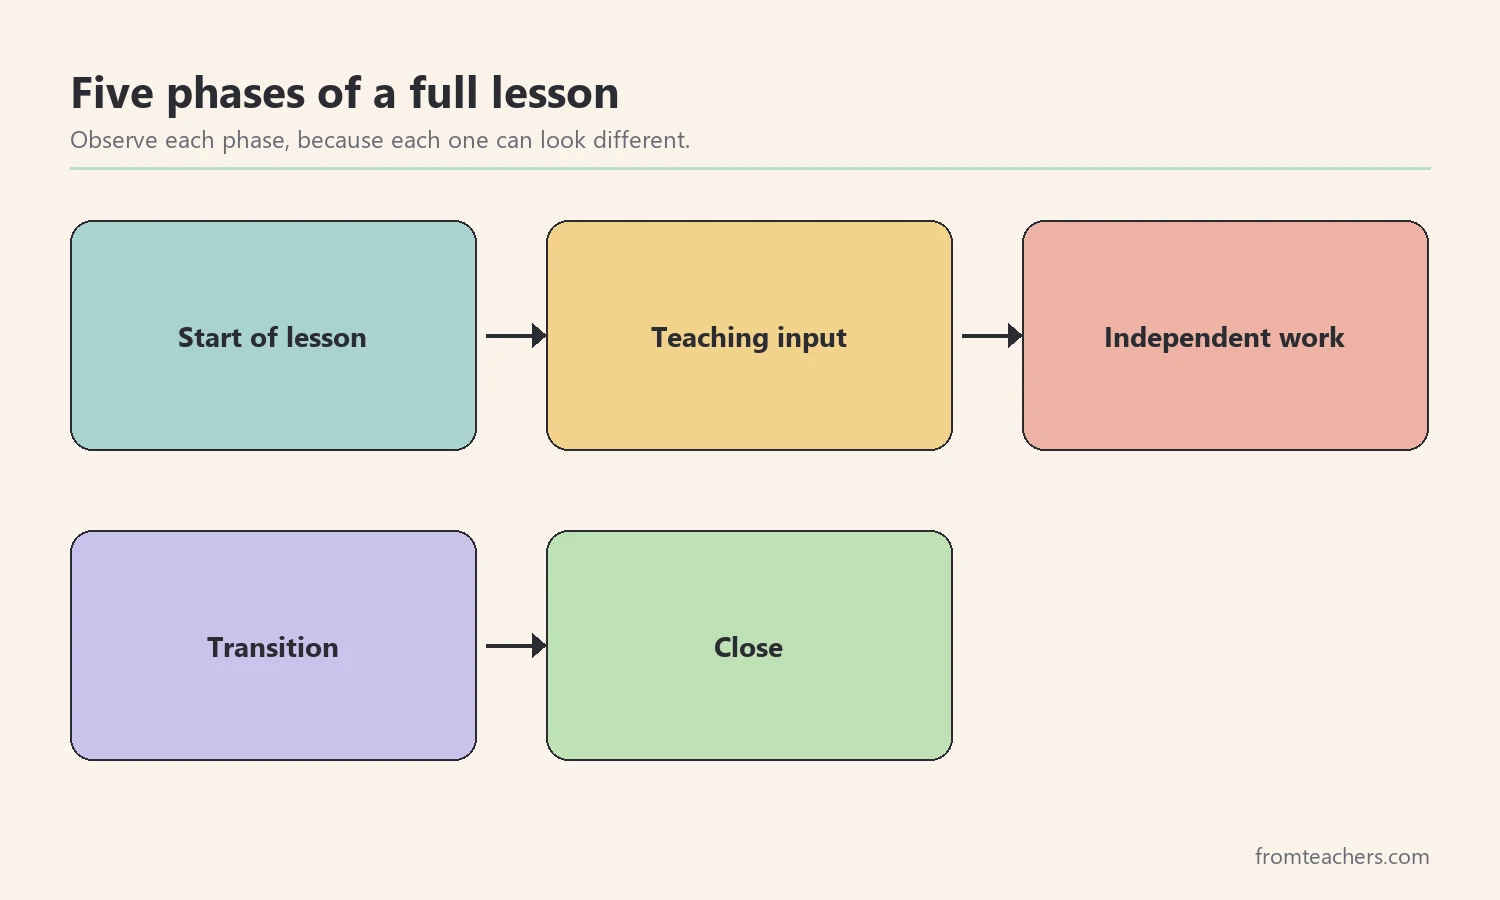
After that, plan to stay for the whole lesson. A full period shows the start, the teaching input, independent work, transitions, and the close. Each phase can look very different for a student with additional needs, so a SEN student observation that covers all of them gives a fairer picture.
In addition, prepare your recording tools in advance. A clipboard, a timer for regular checks, and a form with clear sections save you from scrambling once the lesson begins. A well-prepared SEN student observation lets you watch the student rather than your paperwork.
Worked example. Sami is a fictional student in grade 5 with attention and language needs. His family reports that he comes home upset after math. So the support teacher, Mr. Hale, sets one purpose: “See how Sami manages independent math work, and whether his visual checklist is used.” He arranges to observe a full 50-minute math lesson and sits near the side wall.
2. Record the setting and participation
Once the lesson starts, note the setting. Where is the student sitting? How noisy is the room? Is the board easy to see? Who sits nearby? These details often explain behavior that would otherwise seem random.
Also, sketch a quick seating map at the top of your notes. Mark the student, the teacher, nearby peers, doors, and busy areas. A simple map often explains more than a paragraph, and it makes your SEN student observation easier for others to picture.
Next, record participation. Does the student answer questions, follow group instructions, or start tasks on time? Also note interactions with peers and adults. A student may work well with one partner and withdraw with another.
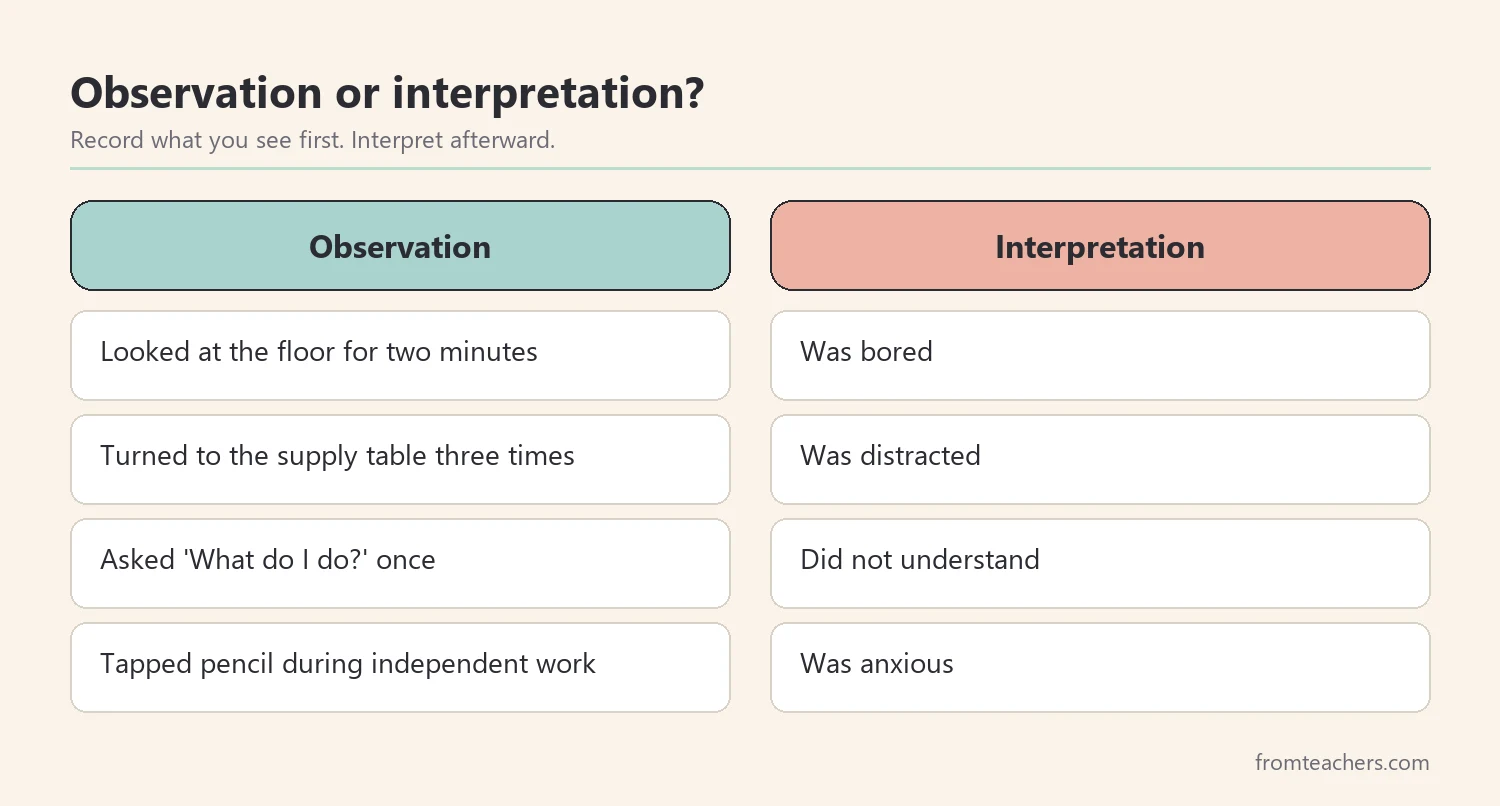
In addition, write what you see, not what you think it means. “Looked at the floor for two minutes during instructions” is an observation. “Was bored” is an interpretation. Keep the two apart, because the team can only trust what was actually seen.
For a faster record, the fillable classroom observation form for SEN students has sections for setting, participation, and interactions, with simple checkboxes you can complete during the lesson.
Also, note the timing of each comment. A quick timestamp, such as “10:12, answered question,” helps you link events to lesson phases later. Without times, even a careful SEN student observation can be hard to interpret.
Worked example. Mr. Hale notes that Sami sits near the door, next to a busy supply table. During the first ten minutes, Sami answers one question and follows the warm-up. When peers walk to the supply table, he turns to watch them three times. Mr. Hale writes those facts down and saves his ideas about distraction for later.
3. Track behavior and self-regulation
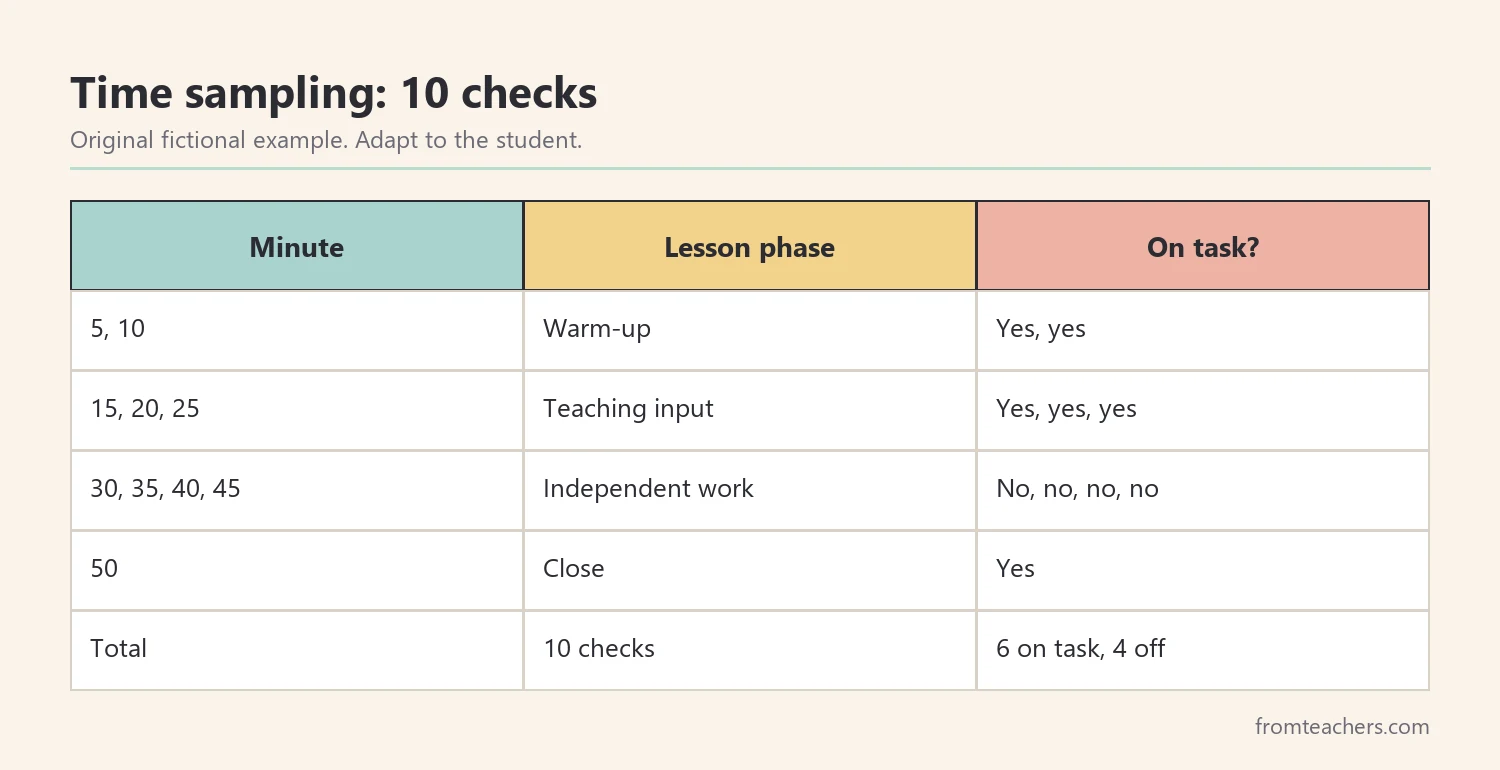
Next, look at on-task behavior and self-regulation across the lesson. A simple way to do this is time sampling. Every five minutes, glance at the student and mark whether they are on task at that moment. Over a full lesson, this gives you a clear pattern without constant writing.
Also, note signs of regulation and dysregulation. Does the student use a calming strategy, ask for a break, or show rising stress through movement or noise? Record what happened just before, because triggers often explain the pattern.
Meanwhile, keep your presence low-key. Avoid making eye contact with the student at each check, and do not step in unless safety requires it. The aim of a SEN student observation is to see the lesson as it usually runs, not as it runs when a visitor gets involved.
Then, look for the shape of the data. In many cases, a student is fine during teacher input and struggles during independent work, or the other way around. A SEN student observation that captures this pattern points straight to where support should go.
Worked example. Mr. Hale makes 10 checks, one every five minutes. Sami is on task at 6 of them and off task at 4. All 4 off-task checks fall during the 20 minutes of independent work. During that time, Sami taps his pencil, looks at the supply table, and once asks, “What do I do?” He does not use his calming strategy.
4. Check academic support in the SEN student observation
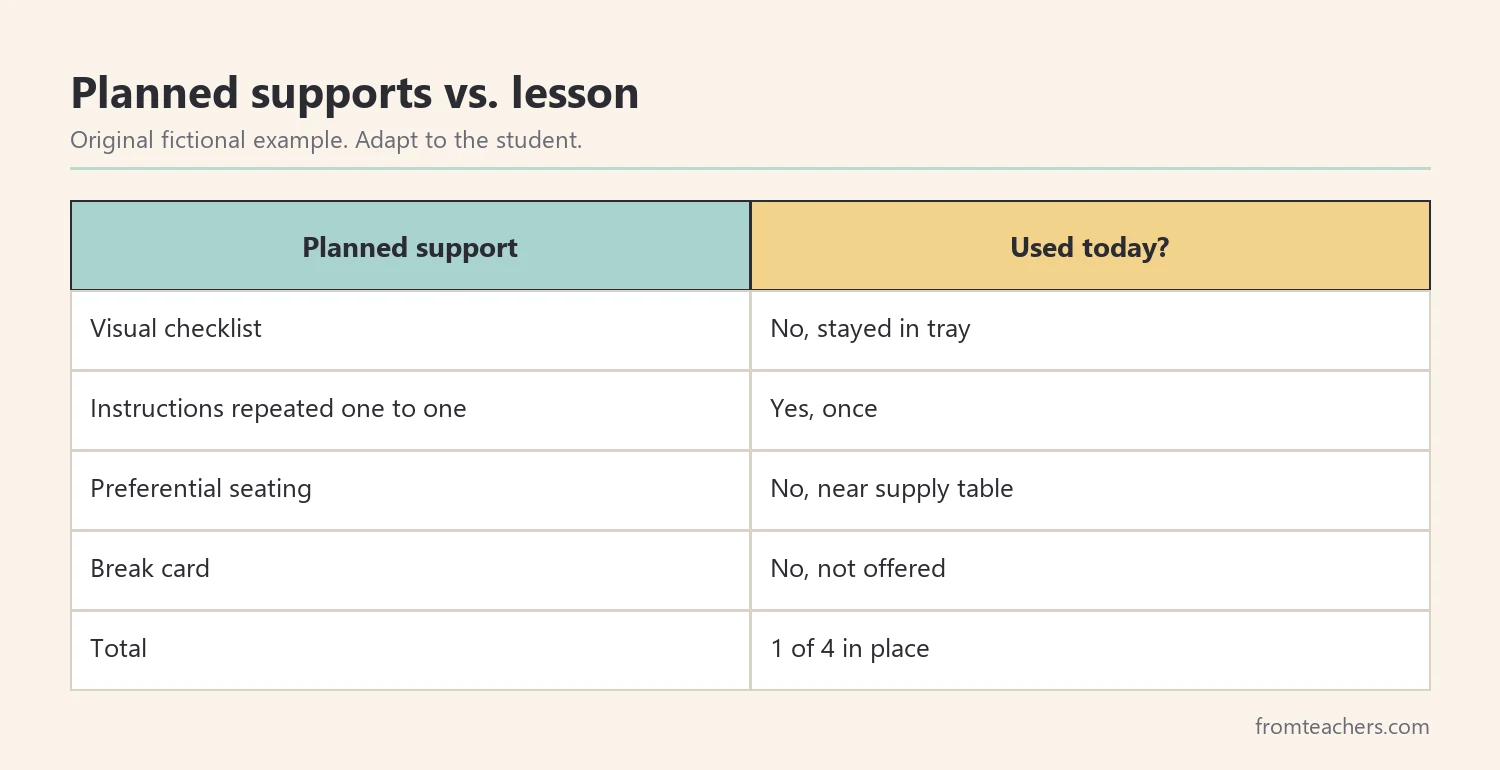
After that, focus on academic support. List the accommodations the student is supposed to receive, then note whether each one was actually used. This is one of the most useful parts of any SEN student observation, because plans and practice often drift apart.
Next, note the student’s academic performance. Did they complete the task? Was the work at the right level? Did they need adult help, and how much? Also note what kind of help worked, such as a repeated instruction, a worked example, or a peer.
Also, note how the student responds to help. Some students accept adult support easily, while others prefer a peer or a written prompt. These details help the team choose supports the student will actually use, which makes the SEN student observation far more practical.
Meanwhile, stay neutral about the class teacher. Supports may be missing for many reasons: a busy room, a new staff member, or a tool that has been lost. Your role is to record, not to judge, so the team can solve it together.
In addition, record what the student produced. A photo or copy of the work, with the time it was finished, adds useful detail to any SEN student observation and helps the team judge whether the task level was right.
Worked example. Sami’s plan lists four supports: a visual checklist, instructions repeated one to one, preferential seating, and a break card. During the lesson, the checklist is in his tray but not used, instructions are repeated once, his seat is near the busy supply table, and the break card is not offered. So 1 of 4 supports is in place. Sami completes 3 of 8 math problems, all of them correct.
5. Turn notes into recommendations and share them
Finally, turn your notes into a few practical recommendations. Read through the observation and look for patterns: when did the student do well, when did they struggle, and which supports made a difference? Then write two or three clear next steps.
Also, group your notes by lesson phase before you write anything. Seeing the start, input, independent work, and close side by side makes patterns jump out. This simple sorting step turns a SEN student observation from a list of events into clear evidence.
Keep recommendations specific and doable. “Move seat away from the supply table” is easier to act on than “reduce distractions.” Also, link each recommendation to something you actually saw. That makes your SEN student observation more convincing in meetings.
In addition, write a short summary that someone who was not in the room can understand. Start with the purpose, then give the key patterns, then the recommendations. A clear one-page summary makes your SEN student observation easy to use in planning meetings.
Then share the findings promptly. Talk with the class teacher first, ideally within a day or two, so nothing feels like a surprise. After that, share a short summary with the family and the wider team. Include strengths as well as concerns.
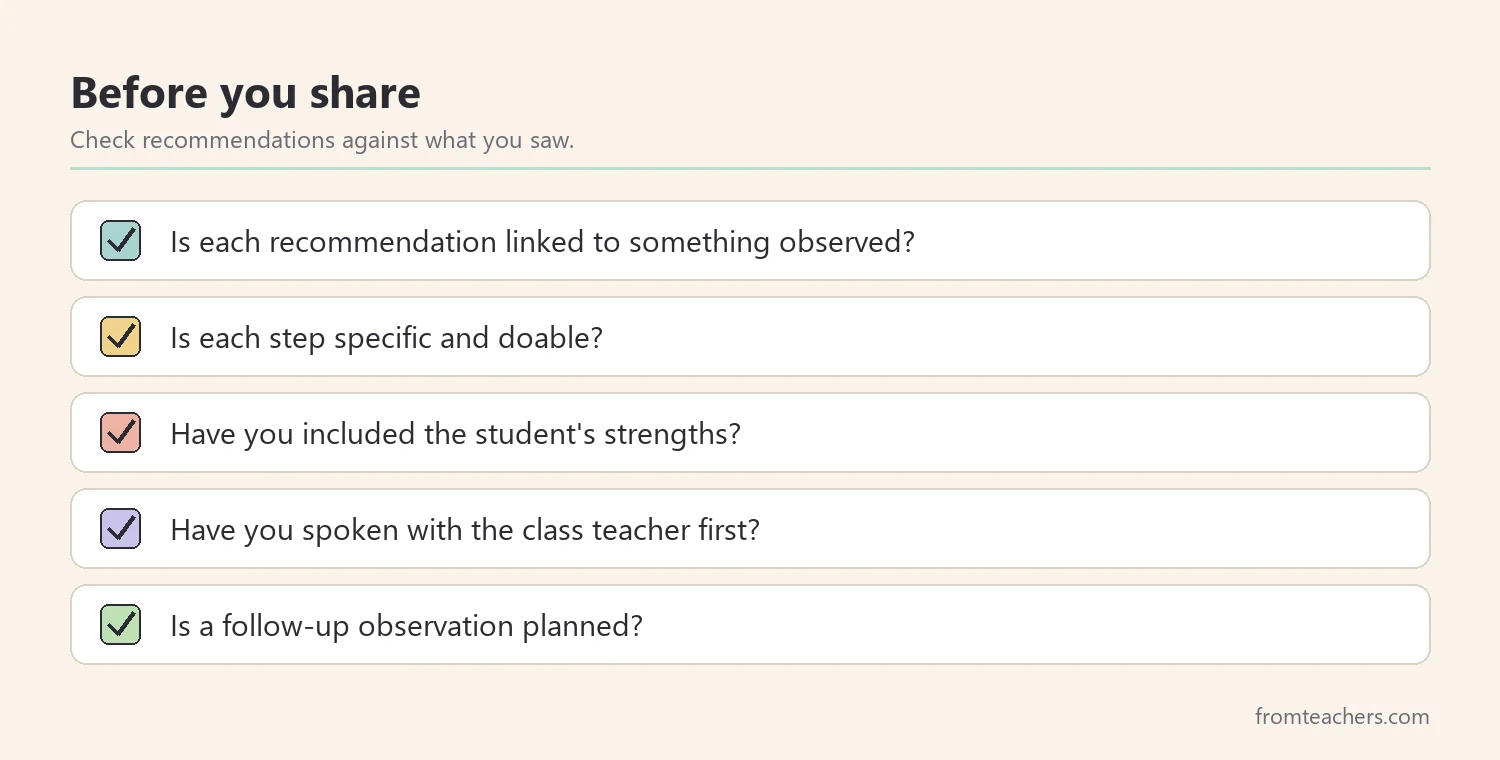
Worked example. Mr. Hale writes three recommendations: move Sami’s seat away from the supply table, prompt him to use his visual checklist at the start of independent work, and offer the break card once in each lesson. He also notes a strength: all three problems Sami completed were correct. Two weeks later, a follow-up observation shows Sami on task at 8 of 10 checks.
Planning follow-up observations
One observation is a snapshot of a single lesson. So, plan a follow-up after any changes are made. Use the same form and the same time-sampling routine, because matching methods make comparisons fair.
Also, vary the subject or time of day when you can. A student may do well in math in the morning and struggle in reading after lunch. A second or third SEN student observation in a different setting shows whether the pattern holds.
Finally, keep all notes in one place, such as the student’s support file. Over a term, these records build a clear picture of progress that families and staff can trust.
Common mistakes and how to avoid them
- Observing for five minutes. Short visits miss the hard moments. Fix: stay for the whole lesson.
- No clear purpose. Notes become a long, unfocused list. Fix: set one or two questions before you start.
- Mixing facts and opinions. Interpretations weaken the evidence. Fix: record what you see, then interpret afterward.
- Ignoring planned supports. You miss the gap between plan and practice. Fix: list each support and check its use.
- Vague recommendations. Nobody knows what to change. Fix: write specific, doable next steps.
- Sharing late. Findings lose value. Fix: talk with the class teacher within a day or two.
Questions teachers and parents ask about SEN student observation
How long should a SEN student observation last?
A full class period is ideal, often 45 to 60 minutes. That covers the start, teaching, independent work, and close. Shorter visits can help for a specific question, but they rarely show the full picture.
Who usually carries out the observation?
It is often a special education teacher, SENCO, support teacher, or school psychologist. Sometimes the class teacher observes with a colleague covering the lesson. The key is someone who can watch without also teaching.
Should the student know they are being observed?
Many observers sit quietly and avoid drawing attention to the student. Older students may be told in a general way that an adult is visiting the class. Follow your school’s practice and talk with the family where appropriate.
How many observations are enough?
One full observation is a good start, but behavior can vary by day and subject. Two or three observations in different lessons give stronger evidence. A follow-up after changes shows whether the new supports work.
Can an observation lead to a diagnosis?
No. An observation is evidence for planning, not a diagnosis. It can help the team decide whether further assessment by qualified professionals is needed.
Related reading: The Power of Data Tracking in Special Education, Accommodations vs Modifications in Special Education: The Difference Explained, and Special Education Accommodation and Modification Tracker.
A companion resource for SEN student observation:
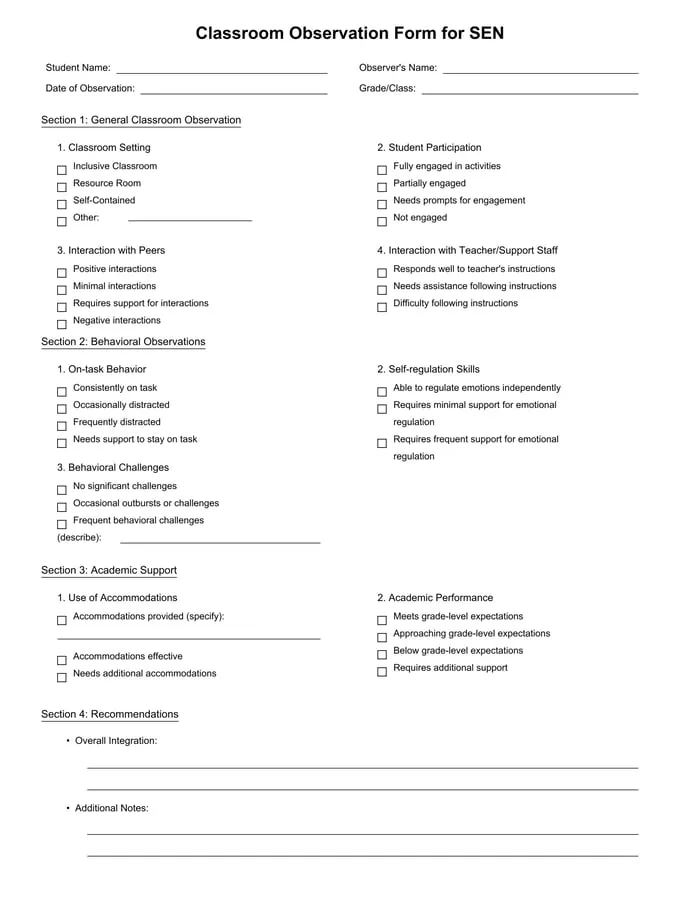
Classroom Observation Form for SEN Students: a fillable PDF that covers setting, participation, interactions, behavior, self-regulation, academic support, and recommendations, with simple checkboxes for live observation.
Sources and scope
- IRIS Center, Vanderbilt University: free modules on behavior, data collection, and classroom supports.
- IDEA, U.S. Department of Education: the law behind special education services and evaluations in the United States.
- nasen: a UK organization supporting educators who work with pupils with special educational needs.
- Understood.org: family-friendly information on learning and thinking differences.
This guide covers planning and running a classroom observation for a student with additional needs. It does not replace formal assessment, diagnosis, or the decisions of the student’s support team.
Key takeaways
- A SEN student observation works best across a full lesson.
- Set a clear purpose and review the student’s plan first.
- Record facts, and keep interpretations separate.
- Check which planned supports were actually used.
- Share a few specific recommendations quickly, including strengths.






Leave a Comment