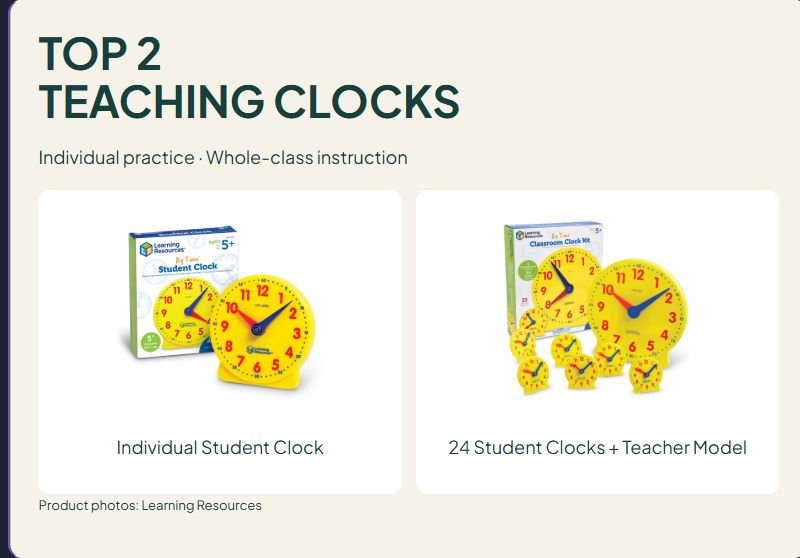

TOP 2
TEACHING CLOCKS
Individual practice · Whole-class instruction

Individual Student Clock

24 Student Clocks + Teacher Model
Product photos: Learning Resources
Affiliate disclosure: As an Amazon Associate I earn from qualifying purchases. Purchases through our links may earn a commission at no additional cost to you.
A teaching clock is most useful when its hands show how hours and minutes move together. At 3:30, the hour hand should sit between 3 and 4. A model that keeps it parked exactly on 3 can reinforce a misunderstanding, even when a child reads the minute hand correctly.
These two Learning Resources options use geared hands but serve different group sizes. Choose the individual Student Clock for one learner or the Classroom Clock Kit when students need to follow a large demonstration simultaneously. This comparison is based on manufacturer documentation, not hands-on testing. It does not rank durability or customer satisfaction.
Quick comparison
| Option | Manufacturer model | Documented format | Best use | Main limitation |
|---|---|---|---|---|
| Big Time Student Clock | LER2095 | One 12-hour analog clock; removable stand and activity guide | One child or a tutor | One learner can manipulate it at a time |
| Big Time Classroom Clock Kit | LER2102 | One 13-inch demonstration clock and 24 mini student clocks | Whole-class modeling | Classes above 24 need pairs or additional student clocks |
Both manufacturer pages list ages 5+ and a small-parts warning for children under 3. Match the tool to the child's readiness and supervision needs rather than treating an age label as a learning guarantee.
1. Big Time Student Clock: a focused option for one learner
The LER2095 is a 12-hour analog teaching clock. Its hidden gears move the hour hand as the learner moves the minute hand. The manufacturer describes one-minute increments, color-coded hands, a removable stand and an activity guide. Listed overall dimensions are 1.5 by 5.2 by 6.1 inches; those are product dimensions, not a claim about the dial's diameter.
That combination makes sense for a parent practicing beside a child or a tutor working through a short lesson. The stand lets the learner alternate between looking at the clock upright and handling it during an explanation.
Reasons to choose it: A single clock avoids buying a classroom pack for home use. Synchronized hands make it possible to discuss why the hour hand moves gradually. Color coding gives adults a consistent way to distinguish the two hands.
Limitations: This is a teaching manipulative, not a replacement for a running wall clock. One unit does not give a whole group individual practice. The manufacturer page includes a broad marketing reference to ages 4–8, while its item header and detailed guidance say ages 5+; follow the specific product labeling on the item you order.
Useful first activity: Ask the child to set 2:00, then move the minute hand through a full turn. Watch the hour hand reach 3. Next stop at 2:30 and ask why the shorter hand is between the numbers. Let the child explain before supplying a rule.
2. Big Time Classroom Clock Kit: coordinated whole-class practice
The LER2102 combines a 13-inch demonstration clock with 24 mini student clocks and an activity guide. The manufacturer describes synchronized movable hands, bold numbers and color coding. This package supports simultaneous instruction: the teacher can model a time on a larger face while students set their own clocks.
Check class size carefully. The large teacher clock does not turn a 24-student pack into 25 individual student clocks. A class of 28 would need four students to share, additional clocks, or an alternative response method.
Reasons to choose it: The larger model supports teacher explanation. Matching student manipulatives encourage active responses. Buying a coordinated kit can simplify planning when both demonstration and student clocks are needed.
Limitations: The package may be excessive for one child or a small tutoring group. A 13-inch demonstration face still needs an appropriate viewing distance; check whether students at the back can see the hands clearly. The manufacturer description does not specify the mini clocks' face diameter, so check the exact package if student face size matters.
Useful whole-class activity: Model 6:15, then ask students to show 30 minutes later. Compare where both hands end up. Repeat with an hour boundary, such as 6:45 plus 30 minutes, to distinguish elapsed-time reasoning from simply adding numbers on the face.
What to check before buying a teaching clock
Start with group size. One clock can be enough for a conversation at home, but independent classroom responses require enough student units. Count the demonstration model separately from student clocks.
Next consider readability and access. Large numbers, contrast and hand colors can help, but a child should not have to rely on color alone. Teach the terms hour hand and minute hand, compare their lengths and try the model at the actual working distance. A larger demonstration clock can support shared explanation, while smaller tools suit close-up work.
Check gearing. A linked hour hand should move gradually as minutes advance. This relationship matters at half past and quarter to, not just at exact hours. Use the movement to explain time instead of treating the model as a dial on which to memorize positions.
Finally, distinguish analog practice from timekeeping. These are manually operated learning tools. For noticing the real passage of time during a routine, use a suitable working clock or timer alongside them. None of the product descriptions here establishes a need for an electronic toy or sound effects.
A short practice sequence
Begin with whole hours, then connect one complete minute-hand turn to one hour. Introduce half hours once the learner can describe where the hour hand goes. Add quarter hours and five-minute counting, then individual minutes when appropriate. Avoid rushing through every stage because the tool supports it.
Connect the analog model to written times. After setting 7:30, write 7:30 beside it and ask which number describes hours and which describes minutes. For elapsed time, move the hands forward while counting the interval. Crossing 12 should change the hour appropriately.
Keep sessions brief and use familiar situations: the start of lunch, a lesson ending, or the time a bus arrives. Ask a learner to explain how they know, rather than rewarding only a fast answer. If frustration rises, simplify the interval or work together on one example.
Frequently asked questions
Is a teaching clock the same as a timer? No. A teaching clock models a time of day and the relationship between hours and minutes. A timer measures an interval. The two can support related lessons but solve different problems.
Do I need 24 student clocks? Only if that quantity fits your teaching arrangement. A home learner may need one. A small group can share or use enough individual clocks for its response format. A whole class needs enough student tools for the response format you plan.
Can a geared clock teach AM and PM by itself? A 12-hour face repeats. Pair it with a daily schedule or written AM/PM labels to explain whether a time falls in the morning, afternoon or evening. Do not imply a mechanical hand position alone distinguishes them.
Which is the best choice? Choose LER2095 for one learner and LER2102 when a teacher demonstration clock plus 24 student models fits the class. Check the exact model and pack contents on the eventual US listing before ordering.
For a separate tool that shows how much time remains during an activity, see our visual timers comparison. A manually set teaching clock and a countdown timer serve different lesson goals.









Leave a Comment